Pencil Sketch Effect: Before and After Image
And as requested by one of our readers, we've extend the tutorial to get a colored sketch effect..
1. Open your image in Photoshop. This effect will look better with large-sized image. Duplicate your image once. Choose the duplicate layer then go to Image > Adjustment > Desaturate.

2. Duplicate the desaturated layer twice, so that now you have 3 black and white layer. Here's what your layer palette should look like:
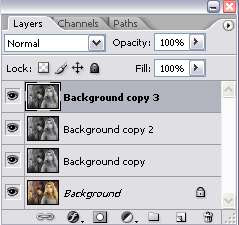
3. Next, go to Layer > New Adjustment Layer > Hue/Saturation. Set the master saturation to -100.
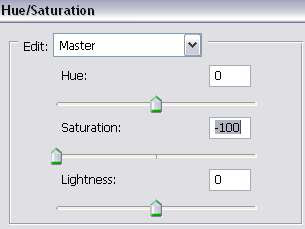
Here's your layer palette now:
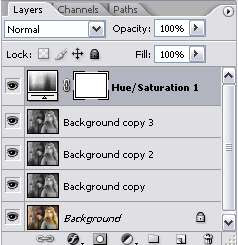
4. Then, select the Background copy layer in your layer palette.
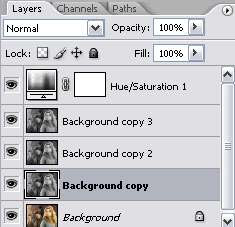
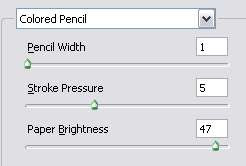
Go to Filter > Artistic > Colored Pencil. Adjust the setting on the right until you get something like this:
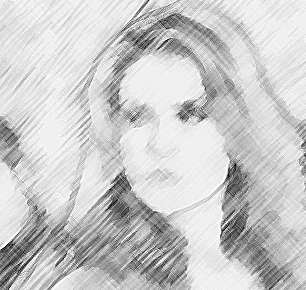
Here's the settings I used. Yours can be different depending on the image.
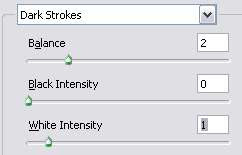
5. Next, select Background copy 2 in your layer palette. Then, go to Filter > Brush Strokes > Dark Strokes. Adjust the setting on the right until you get something like this:
Here's the settings I used. Yours can be different depending on the image.
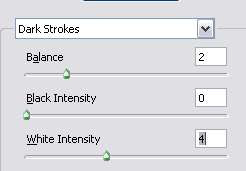
6. Then, select Background copy 3 in your layer palette. Go to Filter > Stylize > Find Edges. After that, go to Filter > Brush Strokes > Dark Strokes. Adjust the setting on the right until you get something like this:
Here's the settings I used. Again, your setting can be different depending on your image.
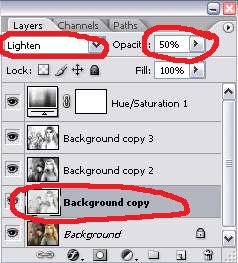
7. Now, we're gonna adjust the property settings of our layers. Here's my recommended settings:
Background copy 1 is set to Lighten with 40% opacity
Background copy 2 is set to Lighten or Hard Light (whichever looks better) with 50% opacity
Background copy 3 is set to Multiply with 25% opacity
Here's how you change the layer setting -- click on the layer in the layer palette then adjust the property and opacity as shown in the image below:
8. And here's the final outcome of this tutorial. A nice pencil sketch effect on your photo.
Okay now you've got your classic black and white pencil sketch. Well, it's a pencil after all, of course there's no color. But if you'd like a color sketch..don't worry, there's still hope for you..we'll try to convert this effect into a colored pencil sketch. Go ahead and follow the the rest of the tutorial.
We're gonna continue with a different image now..just for variety =)
9. Remember, after you're done with step 8, below is your layer palette:

Select the Hue/Saturation layer. And you see that small eye icon to the left of it. Click on the eye icon to make it disappeared. But doing this, you're actually making the Hue/Saturation layer invisible (which means it has no effect or whatsoever to your image).

10. Here's your image now. Not so much miracle but the color is back. If you're satisfied with the coloring, you can stop here. But if you feel like making the color more intense..go on.
11. Go to Layer > New Adjustment Layer > Hue/Saturation. Increase the saturation until you get a bright coloring on your image. You can adjust the brightness too if you want. Below is my settings:
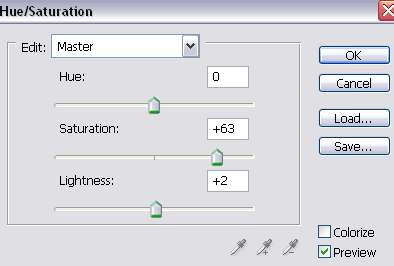
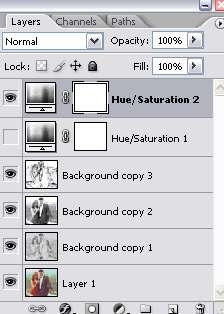
12. Your layer palette should look like this now:
And my final image below...


6 comments:
hi. can't get the final image. my background 0 is tinted green, while that in your example is black and why. thanks anyway.
Green huh...mmm..did you desaturate the image first? Or have you added the hue/saturation adjustment layer on top of everything?
Good tutorial. This may be helpful as well,
http://www.hacktrix.com/how-to-convert-an-image-to-pencil-sketch-using-photoshop
Green tint? I got blue tint and then I did it all over again and discovered that I had set the hue to -100 and not saturation.
This tutorial is the best I have seen and done so far -- and I have tried a lot of them! Almost every tutorial was the same - desaturate, invert, color dodge, and blur - and not one of them was I happy with as the final result. To me they just did not look like a real sketch, nor did it have a feel to it. When using this tutorial's unique approach it doesn't matter what your picture subject is, the end result seems to have a character and a 3-D effect to it. I used a picture of a cat that had a lot of detail and I really liked what it turned into! Now, can you show me how to add some color back into it? :-) Thanks!
Jeannie
@ Jeannie
Thanks for the lovely comment. As requested, I've extend the tutorial above to add some color back to the sketch. Not much, but I hope above method will work out for you.
Post a Comment