1. Open your image. Duplicate it.
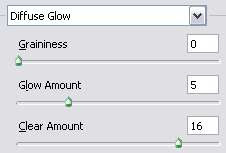
2. Select the duplicate image on the layer palette. Then, go to Filter > Distort > Diffuse Glow. Adjust the settings on the right hand side until you got something like this:
This the setting I use for my image. Just play with the setting until you got the amount of glow you prefer.

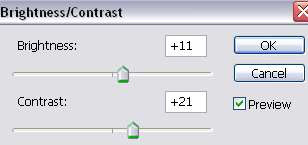
3. Next, go to Layer > New Adjustment Layer > Brightness/Contrast. We're gonna increase the brightness and contrast a little bit. Below is my settings and the result:

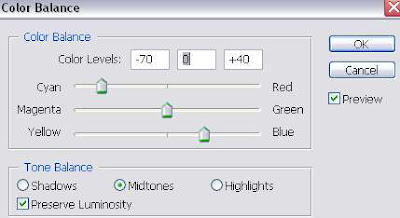
4. Then, go to Layer > New Adjustment Layer > Color Balance. Now, our goal is to get the bluish effect shown below...or if you feel like experimenting on your own, go ahead and try other colorings.
This is the setting I use to get the above coloring. And yes, we're done ;) Now you get the glowing angel effect on your image.


4 comments:
Great tut! Very versatile actually.. I used it in - http://fc09.deviantart.com/fs44/i/2009/148/c/4/Garcon_by_Aquaryss.jpg =)
Wow! that came out beautiful =)
I want to kmow where more good art then soft image
I think every person should glance at this.
Post a Comment