
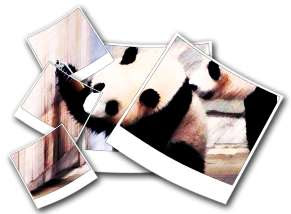
1. Open your image in Photoshop. I'm gonna use the 'Escaping Panda' image as a sample. Yours can be a tiger, lion, monkeys or Megan Fox.
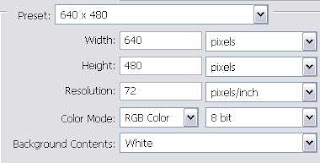
2. Open a blank canvas in Photoshop. File > New. Set the size of your document slightly bigger than your image size above. For instant, my panda image is 500x388 pixels. So, I set the blank document size to 640x480 pixels.
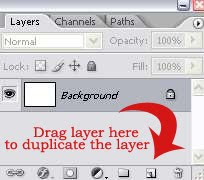
3. For your blank canvas, duplicate the Background layer.
4. Press D on your keyboard to set the background and foreground color to default, black and white.

5. Press B on your keyboard to select the Brush Tool. Choose one of the polaroid brushes you've uploaded to Photoshop. Select the white duplicate layer and click on your canvas to draw the polaroid.
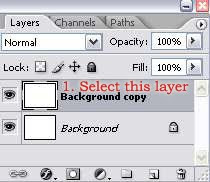
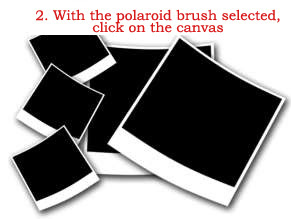
6. Now, drag or copy the 'Escaping Panda' image and place it below the polaroid layer. Below is how your layer palette should look by now.
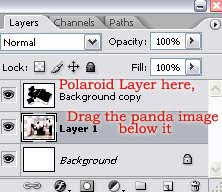
7. Next, select the Magic Wand Tool by pressing W on your keyboard. Then, select the Polaroid Layer on your layer pallete.
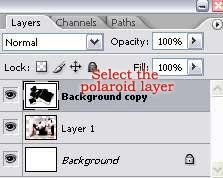
8. Use the Magic Wand tool to select and erase the black area of the polaroid. Do this by clicking on the black area and hit the DELETE key. Repeat this step until you have deleted all the black areas of the polaroid.
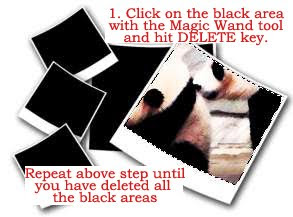
9. And now you can see the Panda image below the polaroid layer thru the 'holes' you made on the polaroid. Below is the result.



13 comments:
thanks a lot, great tutorial :)
Jaw dropping easy! Thank you for the clear concise directions!
--carol
great tutorial!! :) thank you so much! Just wanted to ask if it's possible to have a different backround instead of just plain white and how to do that? thanks again
Well, if you want different bground color, you can do that in step 3. After you duplicate the bground layer, fill it with the color of your choice. And then continue to use the polaroid brush on it and follow the rest of the steps.
I think this would work in PSE also, wouldn't it?
(I'm new to PSE, so please be patient with me if I'm off base.)
KZK
There's no harm in trying it in PSE I guess.. ;)
How cool! It worked! Thank you!!!
The only problem is that if you use a different background colour, the white part of the polaroid shows up that colour, as well. But otherwise, it's a great tutorial. And you can always use an image of a polaroid instead of a brush, which would give you more freedom with the editing.
Hi, I am new to ps, Could someone explain how to have different photos in different polaroid frames?
thanks
Luca
THANK Q FOR A WONDERFUL SITE ..CAN YOU PLEASE DO SOME EYE TUTORIALS :) THANKS A WHOOLLEEE LOT !! :) MAY GOD BLESS YOU.
It's a little upsetting to me to have to ask this question, since one of the other comments is thanking you for how simple this explanation is, but I'm having a problem. My first Polaroid goes down fine, but when I try to put another on top of that, some of its white edges are obscured by the first Polaroid; it's like the second one isn't completely opaque. Yet they all appear completely opaque on your example. I've tried messing with the brush settings endlessly but can't seem to fix it. Any ideas?
I can't really figure out what's your problem here. In my example I used one big polaroid brush. If you're trying to use more than one polaroid brush, maybe the key is how you arrange the layers in your layer palette and know which part of the polaroid to maintain or delete.
Yeah, I really have no idea what I'm doing wrong; I'm only trying one brush. I worked around it, though, by creating a separate white canvas, making one Polaroid, selecting the white background, selecting the inverse, and then copying and pasting that one Polariod onto my original canvas, transforming it from there into different sizes. It's not as efficient, but it works! Thanks for the tutorial!
Post a Comment