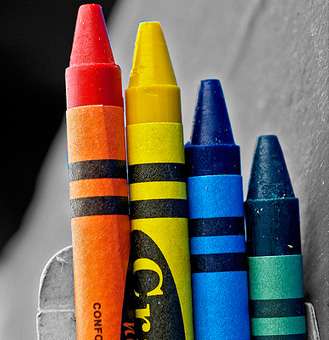
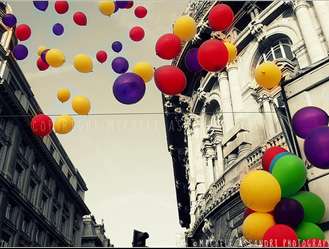
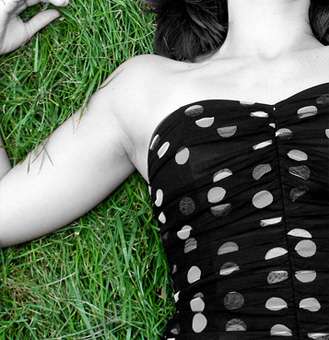
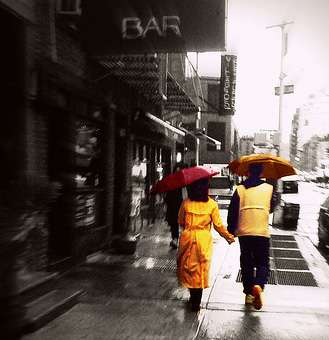
It's almost Friday, so it's about time we get a little bit more inspired. Weekend is coming, isn't that the best news ever =) I hope you find some inspiration in these amazing photos that brilliantly applied the concept of selective coloring. This effect is often used to emphasize the bright colors of the subject by keeping the background desaturated. Nothing to do this weekend? How about picking up that digital camera of yours and just wander around the neighborhood to find something colorful to capture. Then, check out our Selective Coloring Tutorial to learn how to achieve this effect in Photoshop. Have an awesome weekend, my fellow readers!
*Credit to the photographers. Clicking on the picture will bring you to their flickr's page.
Vignetting in photography sometimes is the undesired effect caused by lens limitations. And sometimes, it is intentionally created by photographer to draw viewers' focus to the center of the frame where the subject is. A photo will be bright and clear in the center, while the edges kind of darker. Don't worry though, if you don't have that super-expensive camera, because it's pretty easy to duplicate this effect in Photoshop. Probably will only take less than 60 seconds to achieve this classic vignette effect. Take a look at the sample images below. See how the subject is nicely framed by the dark edges.
Before..
After..
1. Open your image.
2. Go to Filter > Distort > Lens Correction.
3. A new window will open. Look for the Vignette part of the settings. You will see two sliders, AMOUNT and MIDPOINT. Sliding the AMOUNT slider to the left will make the edge darker. Sliding the AMOUNT slider to the right will make the corners brighter and excellent for creating light vignetting on dark image. You can use the MIDPOINT slider to adjust the depth of the effect to your desire.
And we're done. See how simple it is. And below are some additional images I created using this effect.
Not sure what is the right term for this effect. You'll have a cutout image, with a cool slash funky background for it. Amplify the effect by adding a white border around the image and a dashed line or dotted line surrounding it. This tutorial might seem quite long but it's actually a simple effect to achieve in Photoshop once you've got the hang of it. Pardon my abundant use of words, because I'm trying to explain things in more details for first timers. Maybe some examples will help you to understand better what I'm talking about. And yes, I watch Chuck.."occasionally".
1. Open your image in Photoshop. Now, we're gonna delete the background and leave only the main subject to work with. In my case, it's Chuck and Sarah minus the background. If you already have a white background to start with, you can skip step 2 and jump straight to step 4.
2. You can remove background using the Pen Tool Method or the Extract Filter in CS2 and above version of Photoshop. Follow the link below to see the tutorial for both methods. A. Remove Background with Pen Tool B. Remove Background with Extract Filter Alternatively, you can use the Magic Wand tool to make selection and delete the background. But most of the time, it won't give a satisfying result especially with too much distraction in the background.
The Pen Tool works for most background condition, but it takes longer time...facts of life I guess. Since my background is not that complicated, I'm gonna choose the Extract Filter method. And below is my result.
3. Now, we'll create the white border around the image. Go to Layer > New Fill Layer > Solid Color. When the Color Picker window appears, choose white color and click OK. Re-arrange your layer palette so that the white background is underneath your image. Drag and drop your layer on your layer palette to re-arrange. Next, merge the image with the background by clicking CTRL+SHIFT+E.
4. Select the Pen Tool (P). Make sure it is set to Path. Start tracing around your picture. Not so close to edge though, leave some white background for border. First time using Pen Tool, don't worry, you can learn the basic HERE.
Below is what I got after I'm done tracing and close the path (the end point connect with the starting point).
Right click on the path, and choose Make Selection. Set the Radius to 0 and tick the anti-aliased box. Click OK.
Select the Rectangular Marquee Tool (M) in your Tool box. Right click on your selection and choose 'Select Inverse'. Then, hit the Delete key on your keyboard. And you got the white border around your picture.
5. Well, with transparent background, you can't really see the white border. Let's spice the image with colored background. You can also use textures or colorful pattern as your background. To make it simple in this tutorial, I just create a new fill layer as my background. Go to Layer > New Fill Layer > Solid Color. I choose red on the Color Picker window and click OK. Re-arrange your layer palette so that the red background is underneath your image.
6. Now, we're gonna learn how to get that dashed line around the image. Add a new layer by clicking the 'Create a new layer' icon at the bottom of your layer palette.
Select the Pen Tool (P). Set it to Path (like step 4). Create a path around your image. Remember, the dash line will follow exactly the path you make in this step. Below is my finished path.
Next, select the Brush Tool (B). Choose a 9 pixels hard round brush. Click the small icon on the upper right hand side to open the Brush Palette. Click on 'Brush Tip Shape' to bring out the setting for it. Set the brush diameter to 1 px and spacing to 1%.
Set your foreground color to white (or whatever color you want the dashed line to be). Select the Pen Tool again. Right click on your path, and choose Stroke Path. Choose stroke with Brush. Untick the Simulate Pressure option and click OK.
Click CTRL+H to hide the path, so we can see what we just did. Well, notice that it's not a dashed line yet. We're gonna achieve that in our next step. Click CTRL+H to unhide the path.
7. Select the Eraser Tool (E). Make sure the same 9 pixels hard round brush in step 6 is selected. Open the brush Palette. Follow the following setting for the Brush Tip Shape. Diameter: 5 pixels and spacing is set to 200%.
Select the Pen Tool (P). Right click on your path, and choose Stroke Path. This time, choose stroke with Eraser. Untick the Simulate Pressure option and click OK. CTRL+H to hide the path and you got the anticipated dashed lines around your image. Here's the final result.
If you have any problem, feel free to leave a question in the comment section below. READ MORE...