1. Open your image in Photoshop. Create a new layer. I'm gonna call this new layer "WhiteBorder". Then, go to Select > All. Choose Rectangular Marquee Tool (M) on your Toolbox. Right click on your image, choose Stroke. Set the width of the border (mine is set to 25 pixels) and set the color to white. Hit OK and you got a white border set up around your image.
2. Next, select Brush on your Toolbox and follow the steps shown in the picture below.
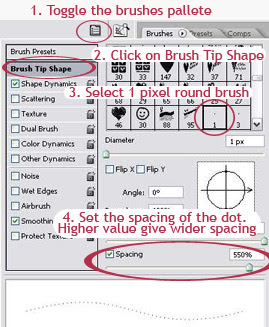
2-1. Click on 'Toggle the Brushes Pallete' to bring out the Brush Palette window.
2-2. Click on 'Brush Tip Shape'.
2-3. Choose the 1 pixel round brush.
2-4. Set the spacing of the dots you want for your border. You can see the preview of the dotted line below it.
3. Set the color you want for your dotted border. You can do this by adjusting the Foreground Color on your Toolbox. I set mine to Dark Grey.
4. Create a new Layer. I name this layer "Dotted". This is where we're gonna create the dotted border.
5. Let's go back to the WhiteBorder layer. CTRL+click on the WhiteBorder Layer to make a selection. Then, go to Select > Inverse to inverse the selection. You'll see that your image is selected.
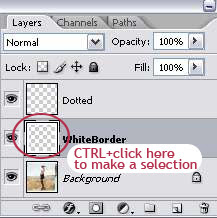
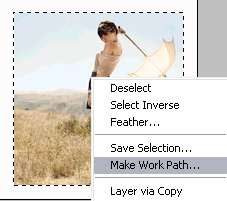
6. On your layer palette, click on the "Dotted" layer. We're gonna start working with this layer now. Then, Select the 'Rectangular Marquee Tool' or hit M on your keyboard. Next, right click on your image and choose 'Make Work Path'. Set the tolerance to 0.5 pixels.
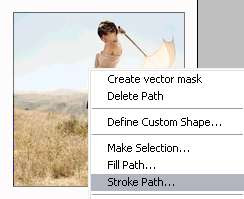
7. Choose the Pen Tool (or hit P on your keyboard). Then, right click on your image and select 'Stroke Path'. A small window will appear. Select 'Brush' as the Tool and hit OK. Now, right click again on your image and choose 'Delete Path'.
Below is your result.
If above is what you want, then you can stop here and save your image as usual. However, if you want something like below, continue with the next step.
Basically, what we're gonna do is widen the white border a little bit so you can get some white space between your image and the dotted border.
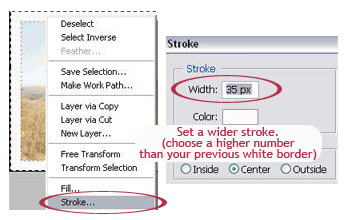
8. Click on the WhiteBorder layer on your layer palette. Go to Select > All. Choose the 'Rectangular Marquee Tool' (M). Then, right click on your image and select 'Stroke'. On a small window that appears, set a higher width value than your previous width in step 1. I choose 35 pixels (my previous setting in step 1 was 25 pixels).
So, that's all about created dotted border on your image.
* * * * * * *
Let's continue our lesson today. Next, I'm gonna show you how to do a dashed line border for your image. We will be using the same concept as the dotted border. Maybe tweak it a little bit to get the dashed line.
1. Follow the same step 1 in above tutorial for dotted border to make a white border around your image.
Basically,we are going to use the brush tool to create a line border. Then use the eraser tool to delete part of the line, so we got the illusion of dashed line around our image.
2. Select the Brush Tool and follow the steps shown below:
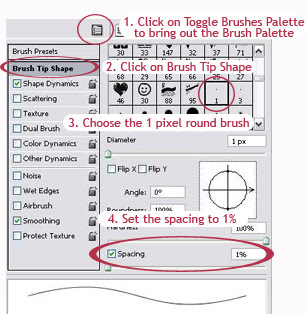
2-1. Click on 'Toggle the Brushes Pallete' to bring out the Brush Palette window.
2-2. Click on 'Brush Tip Shape'.
2-3. Choose the 1 pixel round brush.
2-4. Set the spacing to 1% to get a nice straight line.
3. Select the Eraser Tool and follow the steps shown below:
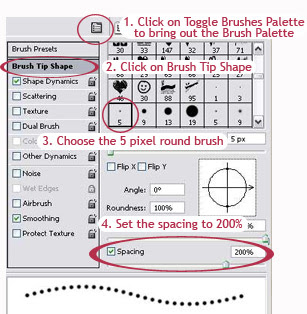
2-1. Click on 'Toggle the Brushes Pallete' to bring out the Brush Palette window.
2-2. Click on 'Brush Tip Shape'.
2-3. Choose the 5 pixel round brush.
2-4. Set the spacing to 200% to get a line of dots.
4. Set the Foreground Color on the Toolbox to the color you want for your border.
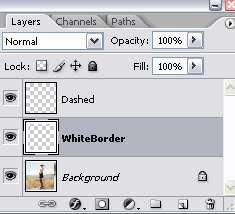
5. Create a new Layer. I name this layer "Dashed". This is where we're gonna create the dashed border. Below is your layer palette up until now.
6. Let's go back to the WhiteBorder layer. CTRL+click on the WhiteBorder Layer to make a selection. Then, go to Select > Inverse to inverse the selection. You'll see that your image is selected.

7. On your layer palette, click on the "Dashed" layer. We're gonna start working with this layer now. Then, Select the 'Rectangular Marquee Tool' or hit M on your keyboard. Next, right click on your image and choose 'Make Work Path'. Set the tolerance to 0.5 pixels.

8. Choose the Pen Tool (or hit P on your keyboard). Then, right click on your image and select 'Stroke Path'. A small window will appear. Select 'Brush' as the Tool and hit OK.

9. Right click again on your image and select 'Stroke Path'. On a small window that appears, this time choose Eraser as the tool and hit OK. Then, right click on your image and choose 'Delete Path'.
You got yourself a nice dashed line border on your image.
You can continue with step 10 below to get a border shown in below image (with a slight space between the dashed line and the image).
10. Click on the WhiteBorder layer on your layer palette. Go to Select > All. Choose the 'Rectangular Marquee Tool' (M). Then, right click on your image and select 'Stroke'. On a small window that appears, set a higer width value than your previous width in step 1. I choose 35 pixels (my previous setting in step 1 was 25 pixels). That's conclude our tutorial @ Best photoshop tutorials for today. Till then, good luck trying this new project in Photoshop.
RELATED LINKS:
Create Picture Frame Using Photoshop Filters
Getting a Rounded Corner Image in Photoshop


1 comment:
Love the tutorial and ur blog :)
Post a Comment