Download: Polaroid Coloring PSD File
Polaroid Coloring in Photoshop
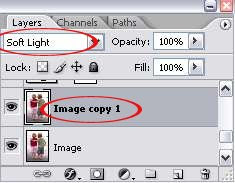
1. Open your image in Photoshop. Duplicate it once. Select the duplicate image on your layer palette and set the blending mode to Soft Light.
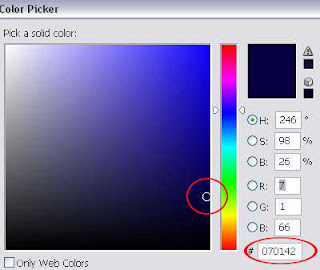
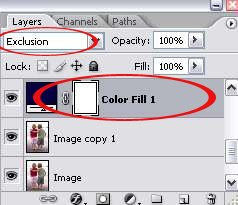
3. Now, go to Layer > New Fill Layer > Solid Color. Choose a really dark blue. I use #070142. Set this Fill Layer to Exclusion.
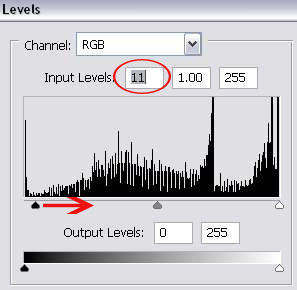
4. Then, go to Layer > New Adjustment Layer > Levels. Slide the black slider to the right a little bit to increase the intensity of the coloring.
You can stop here if you already got the result you want. Or continue with the rest of the tutorial to see if you can get something a little bit more awesome.
5. Add another Color Fill layer. Go to Layer > New Fill Layer > Solid Color. Choose a light orange. I use #de9b82. Set this Color Fill Layer to Soft Light with opacity of 75%.
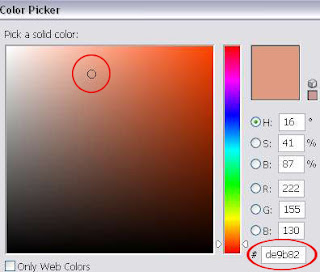
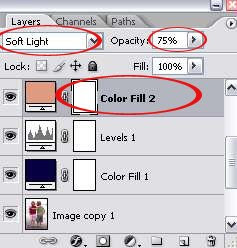
Again, you can choose to stop here.
6. But if you decide to continue, go to Layer > New Fill Layer > Solid Color. Choose a light pink. The color code I use is fed1eb. Then, set this Fill Layer to Soft Light with 50% opacity.

You've got a nice polaroid effect already? If your answer is yes, then you can stop here. Otherwise, let's continue to see if you can get a much better polaroid effect.
7. Add another Color Fill Layer. Go to Layer > New Fill Layer > Solid Color. Select a dark blue. I use #070044. Set this Color Fill Layer to Exclusion, opacity 100%.
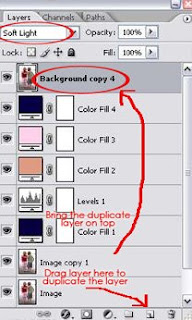
8. Duplicate your original image. And bring this duplicate layer on top of all the layers. Set it to Soft Light.
RELATED POSTS:
Retro Gradient Coloring Effect - PSDs Download
Cross-Processing Retro Photo - Action Download
54 comments:
these colors look nothing like real polaroids.
Great tutorial! Exactly what I was looking for. I disagree with “Anonymous” - the colours do a very good job of imitating the Polaroid effect.
Real good work thanks alot!
your tut was awesome and as michael said Exactly what I was looking for.Finally biggggggg thanks for ur tut.......linus
Very useful tutorial, thanks!
Thank you for this invaluable tutorial.
You rock!
Thanks for this tutorial! Helpful!
Great tutorial. I think it's a great effect and was exactly what I was looking for.
Great tutorial. A diamond in the rough compared to some of the other poor excuses for Polaroid tutorials I've come across. Thanks heaps!
Only problem is, there's quite alot of steps involved in this. Do you think there would be a way of doing it with a few less? Reason being, is that I've found it takes alot of time and alot of Ram to batch edit a series of photos with this number of actions. Other than that though, I was really happy with the results! Thanks again :)
http://www.flickr.com/photos/dallascasey/sets
Hi Dallas,
Glad that this tutorial helped u somehow. As for your question..I haven't figure out a shorter way yet, but maybe you can try step 1-4 only and skip the rest. You'll still get the first polaroid effect =)
Nice, quick tutorial. Thanks for posting
Thanks a lot. I'll have a try!
Thanks for the tutorial... As far as editing a large amount of photos, couldn't you just drag and drop the fill and adjustment layers onto a new photo? Still leaves a few steps but might save you some time. Thanks again!
Wow! I love these colors! thank u so much :)
Very cool results! Thanks for the tutorial!
Thank you SO much! Exactly what I was looking for! :-)
You're very much welcome =)
Great tutorial! used it on my China Lost Polaroids serie.
http://www.skylark-creative.com/blog/post/2010/08/09/China-The-Lost-Polaroids.aspx
Can you give me links to your other tutorials? I'd love to see how you created the Vintage Color Effect.
Wow Thanks for this! I'll post some of my work on my site. :D
Hi there, Abigail..
I would love to check out your site and see how it turns out for you =)
Finally a well written tutorial which does what it says! .. any other tutorials you offer? could you post me a link, i'd love to check them out
Hi Abi,
Click on the 'Photo Effect' menu (top right), you'll find plenty of tutorials listed under there.
i have been looking for this. thanks a lot!!
so u know ur a rock star... like everyone's already told you!!
I have just used your tutorial, and it's great. The only thing I have added is a "feathered" kind of frame effect, using the rectangular marquee tool set to feather of 20, then invert and feather to 20-30 then fill with a dark blue colour and set to soft light to get the really polaroid edge to the photo.
Great Tutorial! Fantastic! Bravo! This was really easy to do and understand, I recommend this to my fellow photoshop user friends.
Brilliant. Just what I was looking for (and it wasn't easy to find). Thanks!
Thanks so much! Loved this tutorial. This was about the 10th one I came across that actually worked how I wanted it to:)
Thanks so much for this...it was exactly what I was looking for and my image came out looking AWESOME.
Thanks again!
THANKSSS
Thanks a lot! it works!! :)
Nice !
great idea, great tut!
Great Tutorial :D
Good jobs, thanks brother
Really useful!! Never used photoshop before and this really helped me to get used to a few things thanks!
:-bd
This is a great tutorial, thanks!
...also, I want to give you a cookie for the OneRepublic lyrics. I recognized them instantly and it gave me fuzziness all over. ♥
Great tutorial. I changed the last duplicate layer to a hard light setting to get the exact look that I wanted. This just opened up a ton of stuff for me. Thanks so much!
GREAT! I have been looking for something like this. One suggestion. I copied the background to the top and pulled the opacity down to 40% - worked really well for me. THANKS!
thanks for information
It did work! awesome!
thanks so much :))
cheers really smart
Incredible tutorial. thank you
real handy and quick, Im doing a CD cover for a mates 40th, perfect.
THANK YOU! U R A LIFE SAVIOR!!! :D
do u happen to have a similar tutorial for night light pictures??
nice tutorial, thanks.. :)
just what the dr ordered! thanks for the easy process.
dude, simple and effective tut. Really good effect in quick n easy steps.
thanks!
Man! let me tell you. u r genious! This is what i was looking for! thanks
man! awesome! this is what I was looking 4. thanks!
Post a Comment