- image cropping
- how to duplicate an image the easy way
- setting the layer properties in Photoshop
- introduction to Selective Color in CS2
- saving an image
1. CROPPING
The crop tool allows you to select an area of an image and discard everything else outside this area. When making icon, some people like to crop first then proceed to do the coloring from there. If you ask me, I do cropping in the end. Why? well, because I can do the coloring on one image and just crop them differently to get 4 to 5 icons...maybe more.
So now, the question is...what is a good cropping? The answer to that is very subjective. But whatever you do, just try to be creative. Below are a few examples of my favorite cropping techniques:
Most part of the face is cropped out..this might be too extreme for some people but then again, there's no limit to creativity, right?
Visible shoulder with cut-out upper-head
As corny as this may sound..I'll have to say, focus on the emotion, guys!
Fair amount of background with smaller focus image positioned to the left or right
Cut through the nose and discard the upper-head
Place the focus subject to the left or right instead of center because that is just plain boring.
Discard the upper-head and place the image to the left or right.
The tutorials below might give you an idea on how to nicely cropped your image:
1. How to achieve a good image position
2. Might wanna read about this aspect ratio thingy
3. More Cropping Tips
2. DUPLICATE
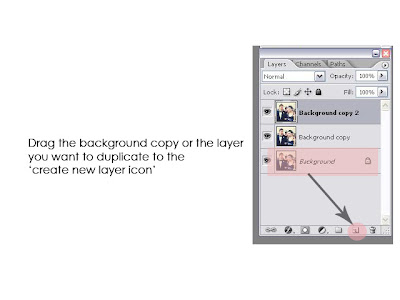
Often, when you're following my coloring tutorial, you're asked to duplicate an image. How? Refer to the pictorial below:

3. LAYER PROPERTIES
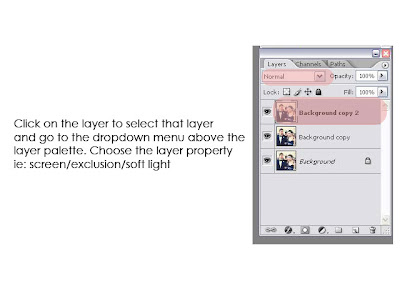
When I say, set the layer to screen or set it to exclusion. Here's how you do that:

4. SELECTIVE COLOR
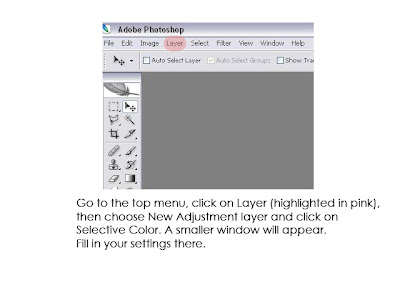
So you got this instruction, 'Layer>New adjustment layer>Selective color' and you're wondering, how am I suppose to do that...well, wonder no more..

If you're interested in grasping the concept of selective coloring, the tutorials below might be helpful.
1. Color Adjustment using Selective Color
2. Selective Color: The Basic Theory
5. OTHER ADJUSTMENT LAYERS
These include...Color Balance, Hue/Saturation, Brightness and Contrast etc...Similar to selective color, all can be found when you click on Layer on the top menu and select New adjustment layer.
6. SAVING AN IMAGE
So, which one is better? PNG or JPEG? Well, since I'm not an expert....Read this to find out


No comments:
Post a Comment