Part A: Introduction
Here's how it works..let say you want to:
1. Open a new image
2. Duplicate the image
3. Resize the image to 50% smaller
4. Copy the resized image
5. Open a new document
6. Paste the resized image on the new document
And you want to do this with 10 photos.
Of course, traditionally, you can open an image file in Photoshop, apply the above steps one by one and keep repeating this until you finished with the 10th image. Imagine how tiring and boring that is. Here's when Photoshop action comes to play the role. All you have to do is:
1. Create a new action and start recording your steps.
2. Do step 1 to 6 mentioned above on your 1st image.
3. Stop the action recording.
For the rest of your images, you don't have to repeat step 1 to 6 again and again. All you have to do is play your recorded action 9 times..and that means with a total of 9 mouse clicks...you're done.
This is just a simple example of how you can use action in Photoshop. In reality, action can be used for far more complicated steps like turning your image into a comic book sketch or achieving a retro effect with your image.
Part B: Knowing your Actions Palette
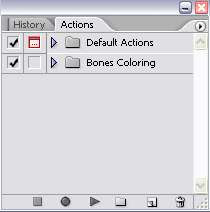
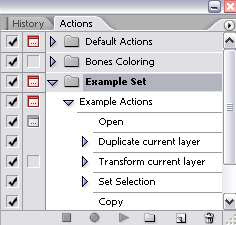
Shown below is your Actions palette. If you can't see it when you open Photoshop, go to Window > Actions.
The picture below will explain further the functions of each icon in the Actions palette.
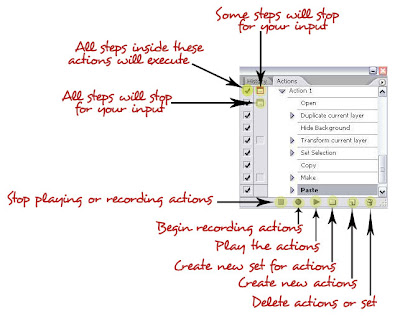
Part C: How to Record Actions
Note that, this tutorial follow the CS2 version of Photoshop. The steps might be slightly different for other versions..just slightly.
Back to our example above, we want to record step 1 to 6.
1. Click on the 'create new set' icon in your Actions palette. A small window will open. Specify the name you want for your set. I'm gonna call this set, the Example Set.
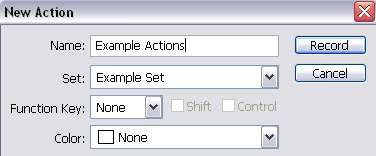
2. Click on the 'create new action' icon in the Actions palette. A small window will open. Specify the action name and choose Example Set as your set. Then, hit the Record button.
3. Our first step is to open a new image. Now, the general step is to go to File > Open. However when it comes to selecting the image you want to open, we want our selection to be specific..so that, when we run the actions later, we can choose what image we want to open. To do this, click on the small arrow icon on the top right and choose Insert Menu Item.
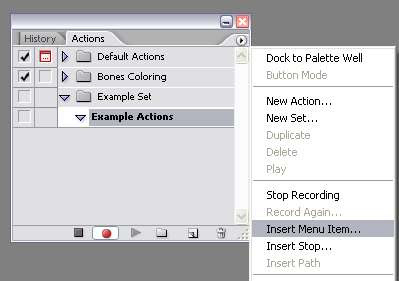
Essentially, what the 'Insert Menu Item' function does is..it allows the actions to pause when we run it later and let the user specify some inputs before continuing with the rest of the steps. For instance, you can choose other menu items like Hue/Saturation adjustment layer and specify different value of master saturation when you run the actions for later use.
4. This window will appear. It says here, to record a menu item, select a menu item using the mouse. So go to File > Open. Then, click OK.

5. We want to pause the recording while we open our first image. Hit the 'stop playing/recording' button at the bottom of the layer palette.
6. Go to File > Open and choose your first image and open it.
7. Now hit the 'Begin Recording' button once again to begin recording the rest of the steps.
8. Duplicate the image. With the duplicate image selected, go to Edit > Transform > Scale. Reduce the size to 50%.
9. To select the resized image, click on the duplicate image layer in the layer palette, put your cursor on the image icon and hit CTRL.
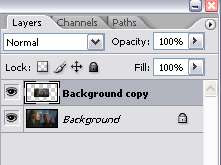
10. Hit CTRL+C to copy the selection. Go to File > New and click OK.
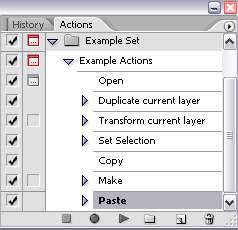
11. Hit CTRL+V to paste the selection on the new document.
12. Now that you're finished with all the steps, Hit the 'Stop Recording' button. And you got yourself a new action.
Part D: How to use Photoshop Actions
Okay, you're done applying step 1 to 6 to your first image. Now, you want to continue with the rest of your images. And how do you do that with the action you just created?
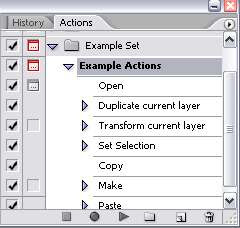
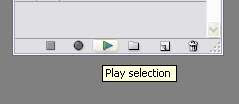
1. Select the 'Example Actions' we created just now and simply hit the 'Play Selection' button.
2. The actions will pause for you to choose the image you want to open. Choose your second image and hit Open.
3. And the Actions will continue to do the rest of the job for you. You'll end up with a nice resized image on a new document.
4. Repeat step 1 to 3 for the rest of your images. Easy as that =)
Part E: Saving Actions in Photoshop
It's best to save the actions you just created to your hard disk after you're done with them. Who knows what could happen in the future..maybe the action will mysteriously disappear from your actions palette and you don't have have a backup copy of it.
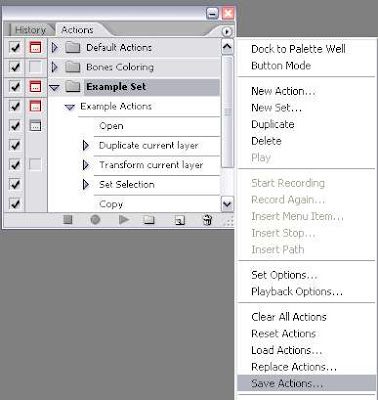
1. So, to save the actions, Select the set the actions are in. In our case, it's the Example Set. Remember, select the set not the actions.
2. Click on the small arrow button on the top right and choose Save Actions.
3. Just go on with the general file saving procedure.
Part F: Opening or Loading an Action File to be Used in Photoshop
Let say you have a friend who wanted to do steps 1 to 6 just like you did just now. Being a kind-hearted person and all, you decided to make his life easier. So, you locate the action file you just saved in your hard disk and send it to him through email or something.
And this is how you can use the Action file (.atn) in Photoshop:
Of course first, you have to save the received action on your HD. And then open Photoshop program. If you can't see it when you open Photoshop, go to Window > Actions.
1. To load the new action, click on the small arrow icon on the top right of the Actions Palette. Choose Load Actions and select the file location and open the action.
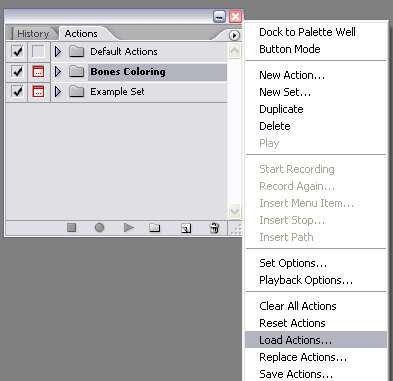
2. The action will now appear in the Actions palette. And you can start using it as usual. See Part D above on how to use the action (.atn) file.


4 comments:
These are great but I'm trying to figure out how to move the created action from one document to another. Some of them require opening a new document to create the action. How do I then transfer the cool text back to my original document?
Well, one way to do that:
1. Run the action in a new document.
2. Flatten the layers (CTRL+Shift+E)
3. Just drag the flatten layers to your original document.
hi thanx for your tutorial.. it's easy to understand for a newbie like me
Thank you sir about writing such a great article, Never knew that it was possible to automate such kind of stuff.
I am new to photoshop and glad that I am going to us your tips.
Thanks
Post a Comment