Pen Sketch Effect in Photoshop: Before and After
1. Open your image. Duplicate the image.
2. Then go to Layer > New Adjustment Layer > hue/Saturation. Decrease the saturation to about -59
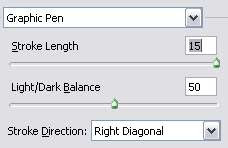
3. Now with the duplicate image selected in the layer palette, go to Filter > Sketch > Graphic Pen. Adjust the setting until you see something similar to this, when scaled down to 50%.
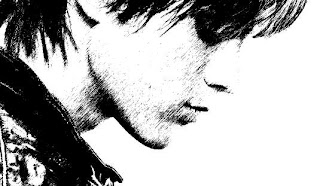
![](https://blogger.googleusercontent.com/img/b/R29vZ2xl/AVvXsEhcfB2ai4g6QVkHj_pm1oLo-iY1Oyx5ObUbSs4MMH2cCwN-p4mqHZnK22NwTXqWX4SDeZVhXDzlekQg_1iOXE552jm5kGQ7hWocVxV_TVGKdfcRHqMdQqpeQpYbXh218_o9CW_nE3xl6AnW/s320/photo+to+sketch+4.jpg)
![](https://blogger.googleusercontent.com/img/b/R29vZ2xl/AVvXsEig8FAbccZ1kOKhZUfjEQyN47w_9WaVxFUV_QhJzb9GDaHiPU0BY-ezv45EFEVLEeHpRJnPDTbTaRXBKDqWoVClOMUGSpvqIEcve8JgAxc68Yh9zFf-t4VpZMB-7hGq8MAcQpaOqNfK-evU/s320/photo+to+sketch+3.jpg)
4. Set this layer to Overlay. And you'll have a black and white pen sketch version of the photo:
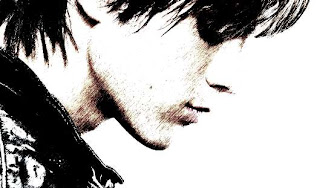
![](https://blogger.googleusercontent.com/img/b/R29vZ2xl/AVvXsEgANu0j3dbGv_kES4TLE4PgdyB3Dw8LdRahEaSy1JfjMIyZORGs38pM7VrgkanDTTh15E_pIYmBU0JPJKK-vDP2qGXmXzQLLMsQO34qC0UgqYM4TvZ217BwskmeH9s9S8pHmP0t2krUOoUV/s320/photo+to+sketch+6.jpg)
5. If that's what you aim for, you can stop here. Otherwise continue with the tutorial to learn about the second effect. We're gonna turn this into a comic book sketch. Change the layer property of the duplicate image to Multiply. (Remember this was set to Overlay just now)
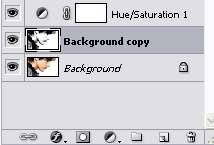
![](https://blogger.googleusercontent.com/img/b/R29vZ2xl/AVvXsEhnDhUa0D3DfwAWZ7zSM0YHgNKOzlsBzeHVcsGXrbDt3hZDsINgI8QzK918mi8t_RtBHuDwLwili0LkHgJH7rqJuGm7IHfin4xIKNX2qUypNSsf1Rxz2cDPYcsWzY-JK4Espwn1LqMIzPN1/s320/photo+to+sketch+7.jpg)
6. Now, double click on the Hue/Saturation layer in the layer palette. A small window will open. Increase the Master saturation to about +50.
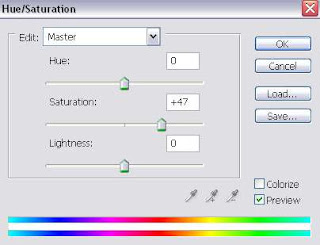
![](https://blogger.googleusercontent.com/img/b/R29vZ2xl/AVvXsEirB4MFo_QNkGfjnz0GZLL-Xa4aGbfiSo0RN7dtD77D9w0E4MCo57gTlWYLzUcHoJkeuj6qKnvEactrhW_agiz4oeKbP3WUHlPc2UDY_VaT_8vL4VfE3_PuRVy7mwsOVt7ky2IWD9Mv6Nbh/s320/photo+to+sketch+8.jpg)
![](https://blogger.googleusercontent.com/img/b/R29vZ2xl/AVvXsEimbK7Fxj22DM3A1coIGf6GLP9F0L07TXNw-nemt859M2OZA1heUTyOOhpBfnUJP8Fii5Dq6jIifh6-3rX9H_t236ENQOY8Go9URAcxLuJ3_4Sx_R7750ATFivptp3N7PivqF6XJcw-Meu5/s320/photo+to+sketch+9.jpg)
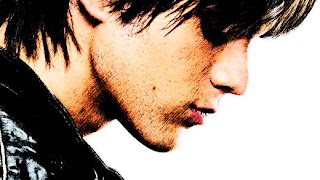
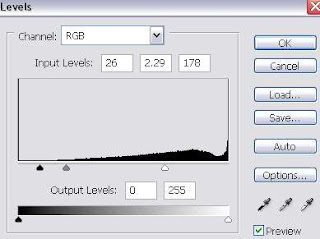
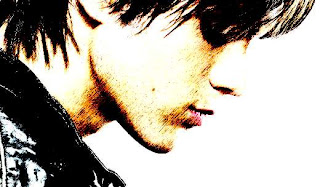
7. Next, go to Layer > New Adjustment Layer > Levels. Adjust the levels setting until you see something like this:
![](https://blogger.googleusercontent.com/img/b/R29vZ2xl/AVvXsEgZqKWFJJkaNuU3L0ja_1JYLe3qq_TD36lIdR1WHyf6HCmbf4nqJdDmI_nVvAQdb2MgjLwuaXiljt0pcDguOUCW9MnQ83StVCg4fmQet7VvUeZY2NTkxp8n4JnKY5HgYuCMcNji9QWWy9bs/s320/photo+to+sketch+11.jpg)
![](https://blogger.googleusercontent.com/img/b/R29vZ2xl/AVvXsEgKWv3mU8zmyoULqxzIL2U78jizLBVte5LrEMW5ueChhmGPg9YQ0bNNDO_0rWDmCYUn5phHnx0oMut6KLGBWdiWhjAHAUmCmGDGBbyo3A2OKiXeI09TachyphenhyphenxclsvwTHE7WE-xkAsOACTOGi/s320/photo+to+sketch+10.jpg)
And there you have it...the final product, an awesome comic or pen sketch effect for your photograph.
No comments:
Post a Comment