Don't feel like using too much brain power right now? Don't worry, there's a PSD file at the end of this tutorial. It's all about making your life easy breezy =)
Bling Text 1 - Font used: Old Script
Bling Text 2 - Font used: Middle Saxony Texts

Bling Text 3 - Font used: Deutsche Zierschrift
Bling Text 4 - Font used: Creampuff

Bling Text 5 - Font used: Blackjack
Bling Text 6 - Font used: All Star
1. Let's get started y'all. Open a new document in Photoshop. File > New and set the size of your canvas and click OK.
2. This bling effect looks nice on dark background, especially black. So, go to Layer > New Fill Layer > Solid Color. Choose black as your color and click OK.
3. Choose the Type Tool from your Toolbox or alternatively, you can click T. On your canvas, type the text you want.
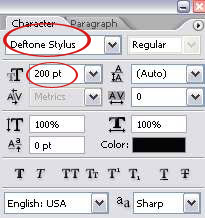
4. The effect will look nicer on larger text. So choose the text you want and increase the size. Mine is set to 200 pt..and I chose a font called Deftone Stylus.


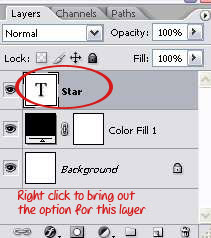
5. GO to the layer palette. Select the Text layer and right click on it to bring out the option for that layer...and choose Blending Option.
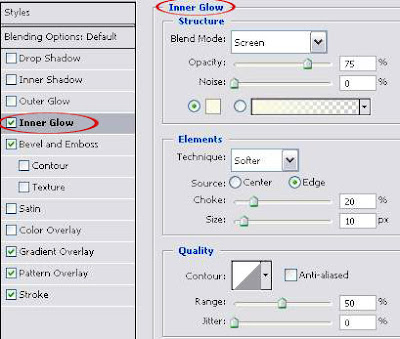
6. You'll see a Layer Style window. Click on the words 'Inner Glow' to select it and simultaneously bring out the settings for Inner Glow. Apply the settings shown below.
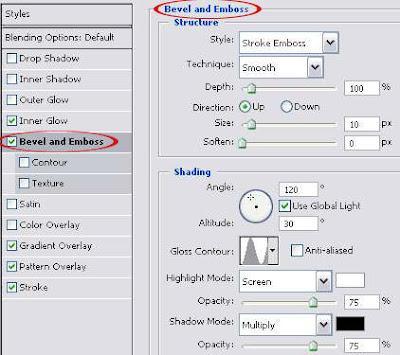
7. Then, click on 'Bevel and Emboss' and apply the settings shown below.
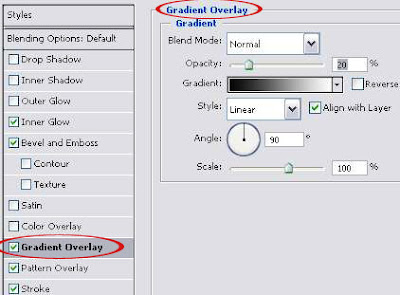
8. Next, click on 'Gradient Overlay' to choose that layer style and use the settings shown below:
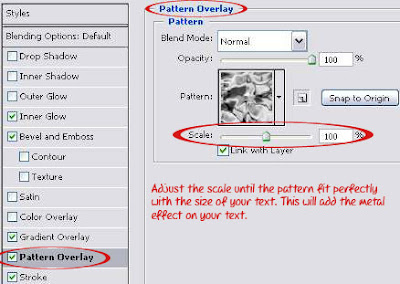
9. Now, click on 'Pattern Overlay' and apply the settings shown below:
Adjust the scale of the pattern until you find a perfect size for your text. Whatever looks nice on the text, that should be your scale setting.
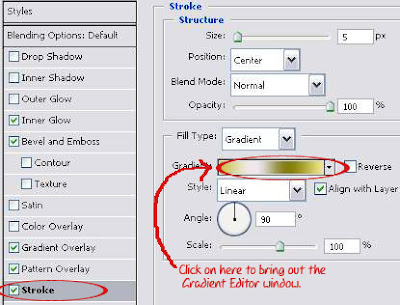
10. Then, click on 'Stroke' to choose that layer style and bring out the setting for it. Use the settings shown below. To set the Gradient color, click on the color bar to bring out the Gradient Editor window.
11. You'll see a long bar. Make sure you have 4 squares below the bar. If you don't, click below the bar where you want a new square to be. The distance between those 4 squares should be quite similar to the picture below.
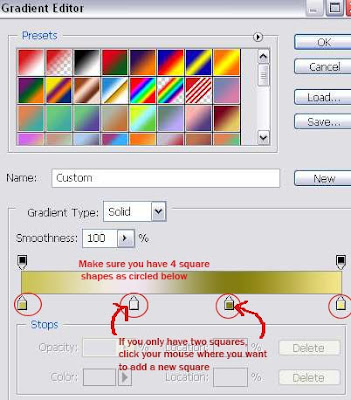
12. Click on the 1st square. You'll see the color chosen for that square. Click on the Color to bring out the Color Picker window and set the color for that square.
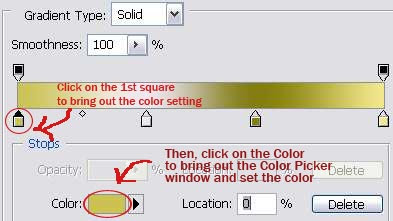
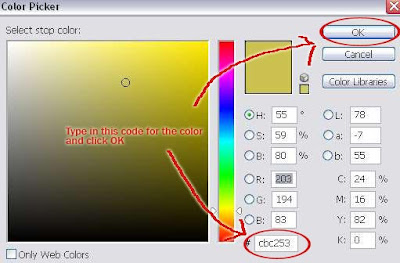
13. To set the color for 2nd square, repeat step 12 above. On the Color Picker window, set the color code to: eee8ee
14. Repeat step 12 for the 3rd square, and the color code is: 847d11
And for the 4th square, set the color code to: f4e78c
After you're done setting the colors to all four squares, click OK on the Gradient Editor window..and OK on the Layer Style window. And you're pretty much done!
15. Okay, maybe one last step. To intensify the bling effect, choose a starry brush or shining brush and just brush on the text..where you think is appropriate. And now you're done!

If you have any question, let me know..otherwise, like my professor used to say, 'I assume you know everything and there'll be a quiz tomorrow'
And as promised..the PSD File for Download: BLING TEXT EFFECT PSD


10 comments:
Typo in your article "Bling Bling Text Effect"
you have:
"there's PSD file..."
better:
"there's a PSD file..."
THANKSSSSS
VERY GOOD WORK!
I have a question. I can't seem to use pattern overlay... And how do I get the brush for the end result?
Thanks
Hi Bloody Angel,
For the starry brush, you can try DeviantART. They have many free brushes.
DeviantART: Free Starry Brushes
Not able to use pattern overlay. I'm not sure here. You have to click on the 'Pattern Overlay' words i/o just tick on the box.
I tried. Clicked the whole bar o.o And I noticed that it had a slightly darker grey around it. As if it were turned off or something...
And er... the brushes were all for photoshop 7 ._. I only have 6 and can't find brushes for 6?
Er..sorry buddy, I also have no idea about your 'Pattern Overlay' problem.
Does the PSD file work for you? I made it in CS2 but it's suppose to be compatible with the older version of Photoshop too.
And I got to admit, it's quite hard to find brushes for PS6. You'll have to depend on Google, I guess.
I have a doubt regarding
"Bling Text 3 - Font used: Deutsche Zierschrift"
How did u get the etched effect in the letters?
Plz reply as soon as possible as possible......
Thanx in advance
Hi Bharat,
I'm not sure if I fully understood your doubt. But I hope this helps. For Bling Text 3, I used the font Deutsche Zierschrift with bigger font size, probably more that 100 point. And the etched effect just kind of appear when the font is big.
hi yor bling psd file doesnt seem to download
Post a Comment