

1. We always start with opening our image in Photoshop.
2. Then, create a new document. Go to File > New. A small window will appear. Use the setting below.
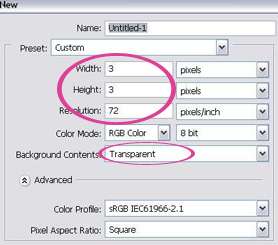
Now, you must be wondering why we're creating this tiny size document. We're actually gonna create a pattern of our own. This pattern is going to be the dotted pattern we'll use on our image. Don't worry if this is new to you. I'm gonna walk you through this. Just take a deep breath.
3. Remember the tiny document you created just now. Zoom in until 1600%. I normally just use the keyboard shortcut to zoom in. CTRL++ several times until you reach 1600%. Here's your document now.

4. Now make sure your foreground color is white. If for some reason it's not, change it to white.

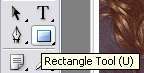
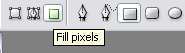
5. Next, select the Rectangle Tool on your ToolBox. Then, on the top menu, select Fill Pixels.
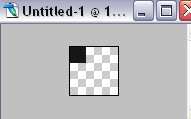
6. Carefully and delicately, draw a small square as shown below. The canvas size is 6x6. You need to draw a square on the top left with size 2x2. (For the sake of making this more clear to you, I gonna use the black color to show the square I had made with the Rectangle Tool. Your square should be white though.)
7. Go to Edit > Define Pattern. A small window will appear. Choose a suitable name for your new pattern and click OK.
8. Now, go back to the image you opened in Step 1.
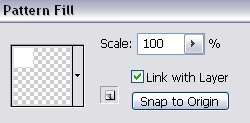
9. Go to Layer > New Fill Layer > Pattern. Select the Pattern we just created earlier.
10. Below is our Layer Palette. Lower the opacity of the Pattern Fill to 50%.
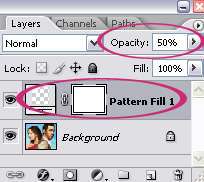
And here's the final result.
Using the basic from this tutorial, you can try to create different pixelated patterns. You can explore with t-shaped pattern or a circle or diagonal pattern. Below is an image created using the diagonal pattern.


5 comments:
This is a really good technique to use when you don't want the background image to overtake the focus on the foreground image. Maybe if you have some text or a logo at the front, you can pixelate the background to make it less noticeable but still look great! Great tutorial!
----
Please visit my new Photoshop tutorials site http://photoshop-mastery.blogspot.com/ :)
I've been wondering how to make that effect in years! Thanks so much for the tutorial :)
I love this look! I was trying to get it to work well for a 300 res image but can't get the right size for the pattern size. The 72 res looks much too small on the 300 res.
What do you suggest?
Hi Linda,
How about setting the resolution to 300 instead of 72 in step 2 (when you're creating the new document for the pattern)?
Let me know if this work for you..
I did that but the pattern was way too small to be seen!
Post a Comment