1. Open the image or background you want to work with in Photoshop.
2. From the Toolbox, select the Rectangle Tool {U}. And at the top menu, select Custom Shape Tool.

3. Select the Shape you want to use. I'm gonna choose the umbrella shape.
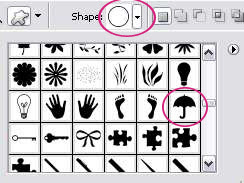
Then, make sure you select Path on the top menu.

4. Next, draw the shape on your background image. Don't worry about it's location relative to your image. We're gonna find out how to move, re-size and rotate the shape later.
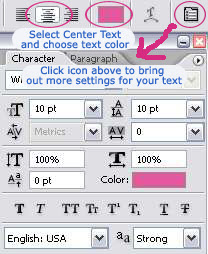
5. Now it's time to insert the text into the shape you just drawn. Select the Type Tool {T}. Choose your font, select Center Text, set the color. You can also bring out more options for your text by clicking the small icon on the right.
6. Click anywhere inside the shape and start typing your words until it fill up all the area inside the shape.
7. You can move the shape together with all the text using the Move Tool {V}. I select the Move Tool and move the umbrella to the top and a little bit to the left.
8. You can adjust the size of the shape or rotate it by selecting Type Tool {T} once again. Click on your words you typed in step 6. You'll see a dotted square surrounding your shape. Adjust the size by dragging any of the small squares around it. Rotate your image by hovering your cursor somewhere at the bottom right of the dotted square until you see a rotate icon. Then, left-click and use your mouse to rotate the shape.
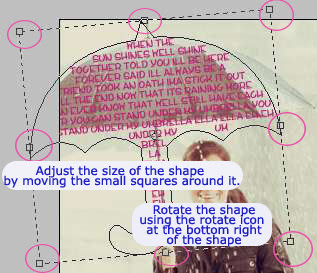
9. After adjusting the text color again to suit my image and adding outer-glow layer style to my text, below is the final result.
Now you can try this effect with other shapes as well. Maybe like butterfly, heart or hot-air balloon..any shape you like. If you like this tutorial, then I'm sure you'll find other useful tutorials @ Best Photoshop Tutorials


10 comments:
Hi, i've been following this blog in a while, I really like your tutorials, actually this is the only website about ps tutorials I've in my bookmarks, and I'm really happy to see that you keep bring us more and more tutorials! Great job :)
By a fan in Portugal ;)
your text effect is so much helpful and also look like nice
@ Tavares and Atiqur
Thank you =) It's always nice to hear something like this.
Thnx for this post :)
Simple and great tutorial. Can you also explain how to fill a shape selected by yourself? (a jacket on a person, for example)
Hi Je!
I think it's rather easy to do that. Use Pen Tool to trace the shape you want. Make sure you select "Path" when you're tracing. Then, select the Type Tool and follow my tutorial above for the rest of the steps.
Simple and great results!
Thanks a lot and best regards from Romania!
Hi, I am trying to add text inside the number 0 when the text is inserted it continues across the centre of the zero instad of wrapping either side. Can you help?
Hi Paul,
To be honest, even I'm not sure how to do it in a simple way. That can be tricky. I'll let you know if I figure it out.
Thanks, I am trying to fill the year numbers 2011 and the other numbers are fine it is just the 0 that does not work correctly.
Post a Comment