

1. Like many other tutorials, it always starts with opening your image in Photoshop.
2. You can do a little editing on the image coloring. If you like the coloring effect applied to the sample image above, you can download the psd file HERE, @ Best Photoshop Tutorials. After you're done with the coloring, flatten your image {CTRL + Shift + E}.
3. Then, create a new layer. Click on the New Layer icon at the bottom of your layer palette to create a new layer.

4. Fill the new layer with black. Go to Edit > Fill. A small window will appear. Select Black as the color you want to use.

5. Next, go to Filter > Render > Lens Flare. Select the type of lens you want to use. You can see the preview image of each lens when you make a selection. Once you satisfied with your selection, click OK.

6. Here's your canvas now.

Our next goal of course is to get the image of Rob Pattinson to appear again. It's not gonna be a hard task. All you have to do is set the blending mode of the black layer to Lighten {or you can choose to set it to Screen}.

7. Ah, the vampire is back. Now you can move the lens flare to the location you want. Select the Move Tool {V} and drag the flare layer anywhere around your canvas. I'm gonna move the flare slightly to the right.
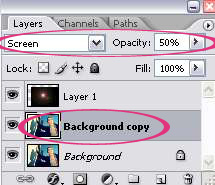
8. As final touch, I'm gonna duplicate the image of Rob Pattinson and set it to Screen with 50% opacity.
Then, I'm gonna add a color fill layer {color code: 280010} and set it to Exclusion. Layer > New Fill Layer > Solid Color. Type in the color code above in the box specified for # and click OK.

Our final image:


4 comments:
Excellent tip..thanks so much for helping a newbie like me.Hugs,Cat
Wow its a nice Tutorial. I like it.
i have also a blog,Please will you visit my blog and suggest me??
http://photoshoptune.tk/
great tutorial. Thanks very much.
nice tutorial
Post a Comment