Pencil Sketch Effect in Photoshop
1. Open your image in Photoshop. Duplicate the image once. Desaturate the duplicate image. Image > Adjustment > Desaturate.
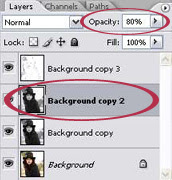
2. Duplicate the desaturate image twice. Below is your layer palette now. We have the original image at the bottom, followed by Background copy, then Background Copy 2 and at the top is Background Copy 3.
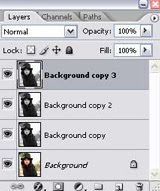
3. On the layer palette, click the top image (Background Copy 3) to continue working with this image layer.
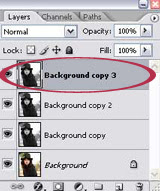
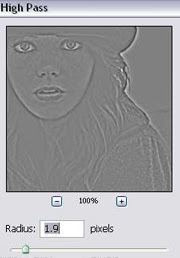
-3a. Go to Filter > Other > High Pass. Adjust the radius until you got something like below. Most probably your setting will be in the range of 1 to 2 pixels.
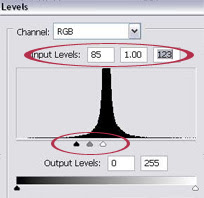
-3b. Then, go to Image > Adjust > Level. Bring the left and right slider to the middle of the graph and close together until you got something like below.
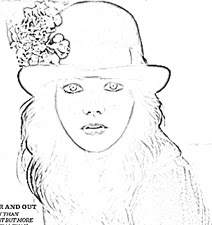
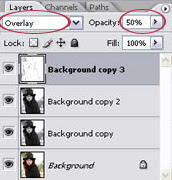
-3c. Set this Layer to Overlay with Opacity at 50%. You can revisit this opacity setting later to adjust it depending on what looks good on your final image.
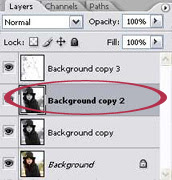
4. Now, select Background Copy 2 to work with this image layer. Follow the steps below:
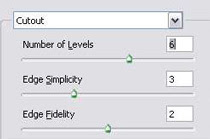
-4a. Go to Filter > Artistic > Cutout. Adjust the settings until you got something like below image. My setting as you can see is 6, 3, 2.
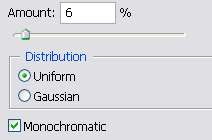
-4b. Next, go o Filter > Noise > Add Noise. Set the amount to around 6%, Distribution to Uniform and select the Monochromatic option.
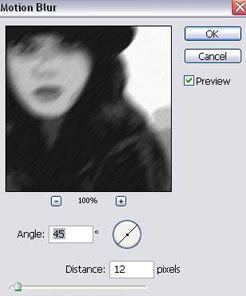
-4c. Then, go to Filter > Blur > Motion Blur. Set the angle to 45 degrees and Distance to 12 pixels.
-4d. Naturally, after applying above effect, our image will look a little bit blur now. We're gonna sharpen it. Go to Filter > Sharpen > Sharpen. You can repeat this step again to get a sharper sketch.
-4e. Set the opacity of this layer between 50% - 80%.
5. Now, click on the Background Copy layer on your layer palette. What we're going to do now is adjust the brightness of our image. To do this, we'll add an adjustment layer on top of this Background Copy layer. Go to Layer > New Adjustment Layer > Brightness and Contrast. Increase the Brightness by 30 or more. I increase mine to 50.
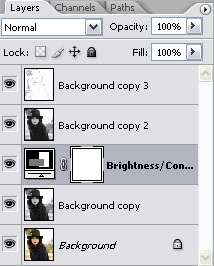
Now, you'll get a nice black and white sketch effect on your image.
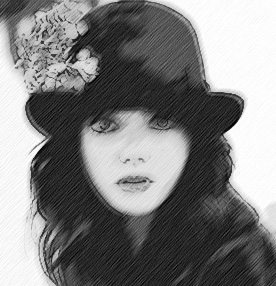
6. To get a colored sketch, just put the Background Copy layer to invisible mode as shown below. By doing this you get to see some color from the original image at the bottom.
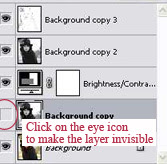
Remember the opacity settings in step 3c and 4e? Now that you're done with all the crucial steps, you can either increase or decrease the opacity of layer Background Copy 3 and Background Copy 2 to get a nicer effect on your image.
7. Finally, we are going to add a paper texture to amplify the sketch effect. Click CTRL + SHIFT + E to flatten your image.
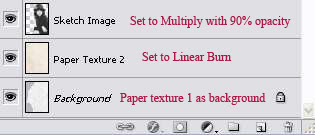
8. Download some nice paper textures from the web or you can choose one from our Paper Texture Collection. Open the paper texture in Photoshop. Drag your sketch image onto the paper texture. Use the eraser tool to erase the unwanted background of your sketch image. Below are my layer settings to blend in the sketch image with the paper texture(s) as background. Of course you can experiment with other blending modes and opacity for each layer.


5 comments:
this is so awesome!! I tried it. its so easy and looks AMAH--ZING!! THANKS!
Thank you for leaving comment. I'm so happy to know that this effect works well for you.
Hi, thank you for the tutorial.
(Im sorry if this posts twice. Im knew to this.)
I am having trouble achieving the pencil effect in 4d using the motion blur. My image looks nothing like yours. All I have is a soft blurred look. My blurred look increases on a 45 degree angle but still does not have that pencil look like yours does.
The photo I am using is 2mb. Photoshop tells me the Image Size is 2284 x 1456 pixels with 72 resolution.
What am I doing wrong and how can I fix this?
Thanks
Hi Pete,
Try sharpening your image several times. I sharpen mine twice until I can see some lines. You can sharpen it more than that if needed. Go to Filter > Sharpen > Sharpen.
Hi..Nice post mate..Really Good..Eay to follow..Keep posting dude
Post a Comment