Instructions are printed on each image. Text below just explain further what you should be doing in each image. For larger view, click on the image. I'm aware that there are other methods to achieve this effect...and this is just one of them =)
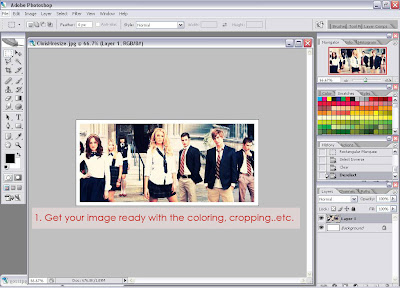
1. If you're interested to know how I get this kind of coloring, CLICK HERE.
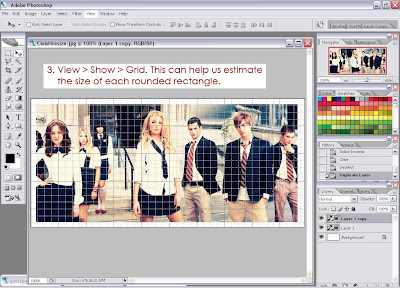
2. Well, for me..the grid is kind of distracting, so I normally would just turn it off after I got the estimate size of the shape. Furthermore, I would advice you to do this because when you're using the shape tool later, the edges are not constrained to be on the grid lines.
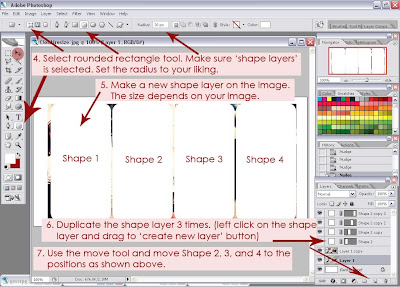
4. Make sure you follow step 4 properly. Forgetting one element could be a chaos...JK..but really...make sure the Shape layers is selected and not the Path. The radius setting is used to determine how rounded the edges would be. I set it to 20.
5. Go ahead and drag out your rounded rectangle shape. Start in the top left corner of the photo and drag your mouse down to the bottom right until you get your desired size.
6, 7. Now you have your first rounded rectangle shape, labeled Shape 1 on the image. After duplicating it 3 times, drag Shape 2, 3 and 4 to the position shown. Just in case you're wondering where the Move Tool is, it's highlighted in red on the top left of the image.
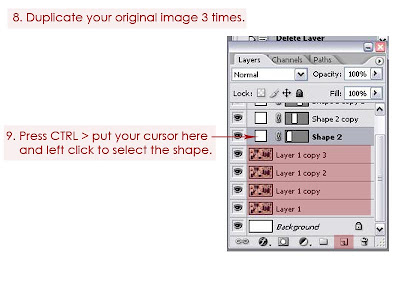
8. See the stuffs highlighted in red. Click on Layer 1 and drag it to Create new layer icon. Repeat this 3 times.
9. After you're done with step 9, Shape 1 should look like the image below with 'dotted-lines' around it.
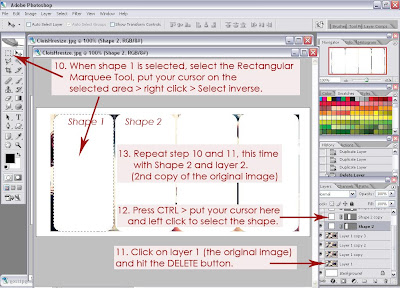
Okay, just a little warning here, the instructions are not in order, step 11 is at the bottom.
12. Essentially, what you're doing in step 12, is the same thing you just did with Shape 1.
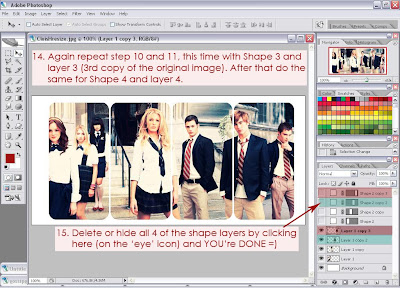
14. As stated before, you're just repeating what you just did, now for Shape 3 and 4. Make sure you pair the layers correctly. Refer to the layer palette at the bottom right of the image. Red with red and green with green...just to avoid confusion really...no big deal.
15. Delete all the shape layers to see what's underneath, yup...it's your finish product. Hooray!!
Okay, maybe one last step..merge all the image layers. Start with the top image, hit CTRL+E. That's the shortcut for Windows, Mac..I'm not so sure..
* I try to make this tutorial as clear as possible, however...if I missed anything, feel free to ask questions.




No comments:
Post a Comment