


1. Open the image that you intend to have rounded corners. I'm gonna use this cute little kitty image I found on the web. Isn't he the cutest thing! (Pardon me if you're not a cat person)

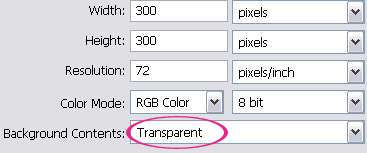
2. Then, open a blank document. Go to File > New. Choose your image size (probably the same as your image in Step 1 or bigger), set the resolution and everything. And remember to set the Background Contents to Transparent.
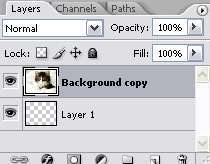
3. Next, drag the kitty image to the transparent blank document you created in Step 2. Here's your layer palette now. Make sure to select the Kitty layer coz we'll be working with it the whole time. Just ignore the transparent background layer. After all, it is transparent.
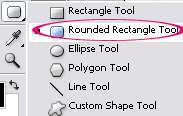
4. Select the Rounded Rectangle Tool from the Toolbox. Choose 'Path' on the top menu. And set the radius of your rectangle. In principle, the higher the radius, the rounder the corner. I choose 10 as my radius.

5. Now, select the area of image you want to maintain.

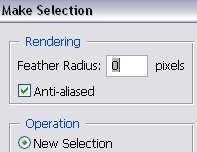
Right click and choose "Make Selection".

If a small window like below appear, just use the default settings shown below.
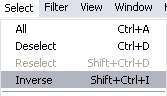
6. Now, go to Select > Inverse. By doing this, we're actually selecting the edge of our image.
Then hit the DELETE key on your keyboard.

To get rid of the distracting selection dashed lines, just press CTRL+DELETE on your keyboard.
7. And finally, a few tips about saving your rounded corners image:
A. You can save it as JPEG format. Go to File > Save for Web > Select JPEG on the drop down menu on the right. But, bear in mind that, JPEG doesn't support transparency. So, the transparent part of your image will become White like below.

B. If you want the rounded corners to be visible when you upload your picture to the web, save it as PNG or GIF. Go to File > Save for Web > Select PNG (or altenatively, GIF)
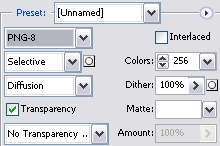
Image saved as PNG format

Image saved as GIF format


7 comments:
Well, that didn't work. What version of photoshop are you using?
I'm using CS2..
great! i did it smoothly.. for anonymous, maybe u have to change your radius like i did..
thanx!
getting horribly confused between the fifth and sixth ste... after i hit contrl on the layer then when i click M i dont get rectangular marqee tool somehow and then everything else i try goes worng... can u explain this to me again :-(
sujata
Hi Sujus,
I re-read my tutorial. And it is a little sloppy for my taste right now. So, I changed it a little bit. I hope it will be easier to follow this time. Let me know if anything confuse you again.
still didn't work....
@mYSarah,
May I know which part didn't work?
Post a Comment