When film was widely used in photography, cross-processing is defined as the procedure of deliberately processing photographic film in a chemical solution intended for a different type of film. Color cross processed photographs are often characterized by unnatural, retro colors with high contrast. (according to Wikipedia..well, I would never come out with such technical words on my own).
And today, cross processing effects can be simulated in digital photography by a number of techniques involving the manipulation of contrast/brightness, hue/saturation and curves in image editors such as Adobe Photoshop. And I'm gonna show you how to do Xpro with the Curves adjustment layers.

1. Open your image in Photoshop.
2. Next, we'll add some contrast to your photo. Go to Layer > New Adjustment Layer > Curves. Most image will do fine with an S-shaped curve. See image below on how to create an S-curve.
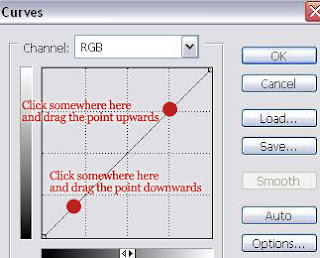
How steep your S-curve depends on your image. If you want steeper curve drag the upper point upwards more and the lower point downwards more. Below is my S-curve.
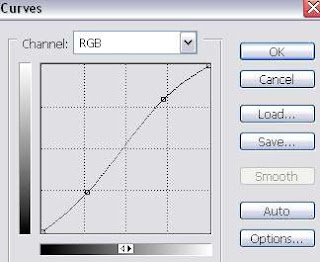
3. Now add one more curve layer. Go to Layer > New Adjustment Layer > Curve. Select "Red" as the channel. And again do that S-shape curve as shown below.
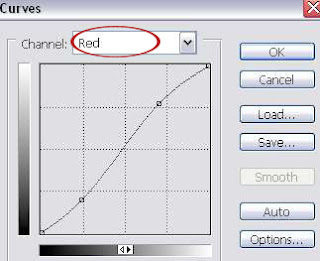
4. Don't close the Curves window yet. Select "Green" as the channel. And do the S-shape curve again.
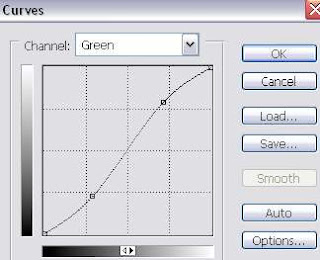
5. Now, we'll continue with the 'Blue' channel. This time do the 'Inverted S-shape'. How you do it? Drag the upper point downwards and the lower point upwards. You'll get something like below.
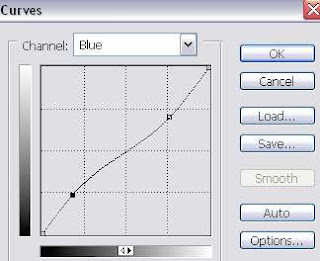
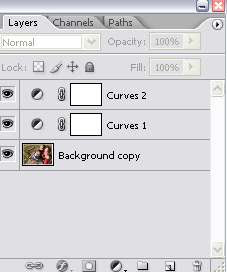
After finishing with all the channels (Red,Green and Blue), click OK. Here's my layer pallete now.
And my final image..

Image credit
Ps: Remember, the shape of your S-curve depends on your image. Experiment with it until you got something you like.
And as a NEW YEAR's gift, I include the PSD file also free of charge.
-- DOWNLOAD CROSS-PROCESSING PSD


3 comments:
rad tutorial, so many ways to do this effect
mine is real similar to yours, but i add another layer w/highpass filter in overlay blend mode, check it out
http://photoshop-pinups.blogspot.com/2010/01/adriana-lima-cross-process-effect-redux.html
i also similar to yours.thank you......
hello about the cross processing effect...you said you add a new layer w/ highpass filter in overlay blend mode... i,ve done that in my photo and it looks great! thanks!
Post a Comment