Fade the Coloring of Your Photo: PSD

I have uploaded the action for this coloring HERE as part of the Dream Big Action: Volume 1. But for those who doesn't want to be bothered what action is and rather work with psd file instead, I guess today is your lucky day. Download the psd file and I'll show you how to get various coloring from the same psd. As you know, when working with different image, the result may turn out differently as well. So, use the steps below as a guide for you to adjust the settings of the layers to get the best outcome for your image.

Download psd file: FADE AWAY PSD


Original photo by eflon @ flickr

Original photo by eflon @ flickr


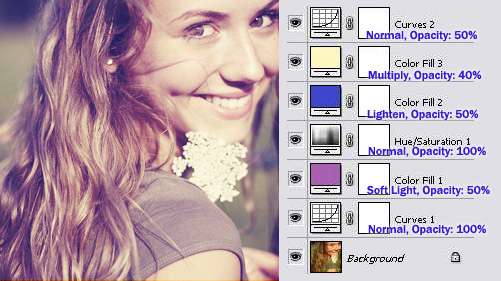
When you download the psd and use it the first time on your image, you'll have the settings above as default. To get different coloring on your image, you need to change the blending mode or opacity of some layers.

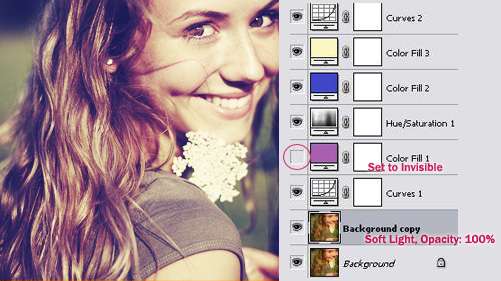
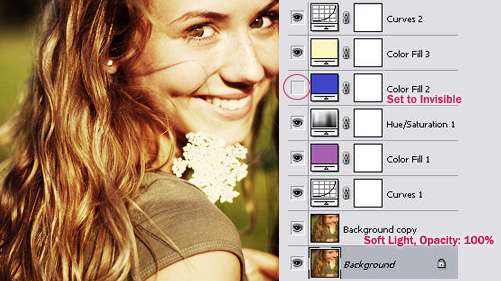
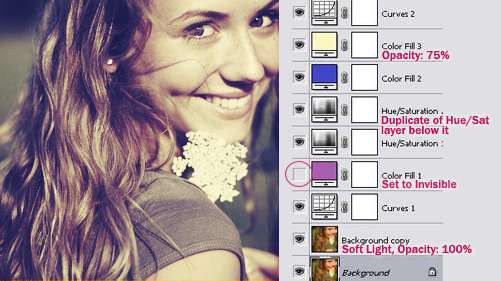
So, to get each coloring shown below, you need to change the setting of the layers indicated by the red text and leave everything else as it is.


READ MORE...

Photo Color Cross Processing in Photoshop: Dream Big Actions Volume 1

Taking pictures is fun. With the camera gone digital, you can snap at almost everything that catches your eyes without having to worry about running out of film. And here's another plus point of keeping digital image..you can explore the much more interesting world of photo cross-processing in Photoshop (provided that you have Photoshop). Sometimes, although your composition is great, the coloring of your photo is just average, and doesn't evoke the kind of feeling you wish to convey to the audience. Well, that is why I have created this free coloring action set. I've decided to call it the 'Dream Big Action: Volume 1' because you should always dream big and there might be possibility for Volume 2. The set contains 5 actions and you can see the preview result of each action below. So, run these actions in Photoshop and start turning your dull photo into something marvelous. You still have a long way to become a professional photographer but at least you can impress your friends now with these unique colorings.

Download Action: DREAM BIG ACTIONS: VOLUME 1

How To Use: Guidelines To Use Our Photo Coloring Action

Original photo by ovizo0n @ flickr
Action: Today is a Fairytale
*PSD file coming soon, so bookmark or follow this blog so you won't miss it


Original photo by eflon @ flickr

Action: Shine for You
*PSD file coming soon, so bookmark or follow this blog so you won't miss it


Original photo by mikebaird @ flickr
Action: Chocolate Eyes
*PSD file coming soon, so bookmark or follow this blog so you won't miss it


Original photo by wili @ flickr

Action: Fade Away DOWNLOAD THE PSD FILE


Original photo by eole @ flickr
Action: Pink Roses
*PSD file coming soon, so bookmark or follow this blog so you won't miss it


"Today is a fairytale. When the sun fades away, I will shine for you. And you can see the pink roses with your chocolate eyes." - Dream Big Action: Volume 1


Tips:
The final result depends on your starting image. Try any tip below for better result
- Try duplicating your image and set it to screen for brighter picture
- Try duplicating your image and set it to Soft Light for more contrast
- Try adjusting the opacity of any layer: Color fill layer or adjustment layer

READ MORE...

Collection of Halloween Photoshop Brushes

Halloween is coming. How excited are you on a scale of 1 to 10? Off-the-scale excited?! Well, here's some awesome Halloween Photoshop Brushes to add to that excitement. These brush sets contain pumpkins, (black) cats, witches, skulls and bones, itsy bitsy spiders, ghost, creepy trees and many other elements that symbolize the eerie effect of Halloween. So, go ahead and dig in. You might not be so talented in sketching the pumpkin yourself, or your cat drawing might turn out to be some other unrecognizable animal albeit the creepiness, but that doesn't mean you have to stop making halloween's art. There's always another option like this collection of Halloween Photoshop Brushes.

Halloween Cat Brushes Halloween Brush Pack


Halloween Brush Set Photoshop Halloween Brush

Halloween Witches Eerie Scene

Brushes Skellington Bats Spider Brushes

All Hallow's Eve Creepy Tree Brushes

Happy Halloween Brush Halloween Photoshop Brushes

Urban Scrawl Photoshop Brushes Exclusive Halloween Brush Set


READ MORE...

Several Polaroids With A Single Picture

This tutorial is actually a sequel to this Polaroid Brushes Resource post. (Well, if they can do the sequel of Mission Impossible 4 times, I deserve at least one sequel, right?) There maybe several ways to achieve below effect (several polaroids that combined into one picture), but I'm gonna show you the simplest of them all. Assuming that you have download and install the brush set below in Photoshop (if you haven't, click on the image to download), we'll begin the tutorial on how to achieve the polaroid effect shown beside it.

Download Polaroid Brushes


1. Open your image in Photoshop. I'm gonna use the 'Escaping Panda' image as a sample. Yours can be a tiger, lion, monkeys or Megan Fox.

2. Open a blank canvas in Photoshop. File > New. Set the size of your document slightly bigger than your image size above. For instant, my panda image is 500x388 pixels. So, I set the blank document size to 640x480 pixels.


3. For your blank canvas, duplicate the Background layer.


4. Press D on your keyboard to set the background and foreground color to default, black and white.


5. Press B on your keyboard to select the Brush Tool. Choose one of the polaroid brushes you've uploaded to Photoshop. Select the white duplicate layer and click on your canvas to draw the polaroid.


6. Now, drag or copy the 'Escaping Panda' image and place it below the polaroid layer. Below is how your layer palette should look by now.


7. Next, select the Magic Wand Tool by pressing W on your keyboard. Then, select the Polaroid Layer on your layer pallete.


8. Use the Magic Wand tool to select and erase the black area of the polaroid. Do this by clicking on the black area and hit the DELETE key. Repeat this step until you have deleted all the black areas of the polaroid.


9. And now you can see the Panda image below the polaroid layer thru the 'holes' you made on the polaroid. Below is the result.


READ MORE...

Soft and Warm Coloring in Photoshop

As much as I love taking photos, I also enjoy processing them in Photoshop. Most of the time your expensive DSLR camera works wonders but sometimes you just need a little bit of adjustment in Photoshop to get the kind of coloring that suits the mood of your photo. So, here's another free Psd for your download. It gives your photo this soft and warm coloring, with some yellow and cyan hue. Depending on your photo, sometimes, you may end up with a little greenish result. A little tip to avoid this: Try adjusting the opacity of the adjustment layers until you get something nice.

Download: Soft and Warm Coloring PSD

How to Use PSD File


Before and After Image Preview:


PS Action: Enhancing Your Portrait Coloring

This morning, I feel like I have to post something here. So, I've created a simple action in Photoshop. Download and run this action in Photoshop to get a nice and bright effect on your portrait image, or whatever image you feel like using. Tips: You can adjust the opacity of each layer to get the best look for your image. There's a Color Balance adjustment layer included in this photo effect. You're welcomed to adjust the settings to get the right coloring for your image. In my sample image, I decided to enhance the red and yellow. Well, download this action, and your facebook profile picture doesn't have to be dull anymore =)

Download Action: Bright Photo Effect

How To Use: Guidelines To Use Our Photo Effect Action


More sample images: