Create Pencil Sketch Photo Effect

It's an undeniable fact that everybody can sketch. Whether it's a nice sketch or not..now that's a whole other story. That is why we have technology or more specifically, an image editing program called Photoshop. And our tutorial today will show you how to turn a digital photo into a nice pencil sketch image. You'll learn how to create a black and white pencil sketch. Also, you'll have the option to turn it into a colored sketch in the end. If you look at the preview picture, with some nice paper textures put into the mix, it can work as a comic book sketch as well. Hope you like this effect.


Pencil Sketch Effect in Photoshop


1. Open your image in Photoshop. Duplicate the image once. Desaturate the duplicate image. Image > Adjustment > Desaturate.

2. Duplicate the desaturate image twice. Below is your layer palette now. We have the original image at the bottom, followed by Background copy, then Background Copy 2 and at the top is Background Copy 3.


3. On the layer palette, click the top image (Background Copy 3) to continue working with this image layer.


-3a. Go to Filter > Other > High Pass. Adjust the radius until you got something like below. Most probably your setting will be in the range of 1 to 2 pixels.


-3b. Then, go to Image > Adjust > Level. Bring the left and right slider to the middle of the graph and close together until you got something like below.


-3c. Set this Layer to Overlay with Opacity at 50%. You can revisit this opacity setting later to adjust it depending on what looks good on your final image.


4. Now, select Background Copy 2 to work with this image layer. Follow the steps below:


-4a. Go to Filter > Artistic > Cutout. Adjust the settings until you got something like below image. My setting as you can see is 6, 3, 2.


-4b. Next, go o Filter > Noise > Add Noise. Set the amount to around 6%, Distribution to Uniform and select the Monochromatic option.


-4c. Then, go to Filter > Blur > Motion Blur. Set the angle to 45 degrees and Distance to 12 pixels.


-4d. Naturally, after applying above effect, our image will look a little bit blur now. We're gonna sharpen it. Go to Filter > Sharpen > Sharpen. You can repeat this step again to get a sharper sketch.


-4e. Set the opacity of this layer between 50% - 80%.


5. Now, click on the Background Copy layer on your layer palette. What we're going to do now is adjust the brightness of our image. To do this, we'll add an adjustment layer on top of this Background Copy layer. Go to Layer > New Adjustment Layer > Brightness and Contrast. Increase the Brightness by 30 or more. I increase mine to 50.


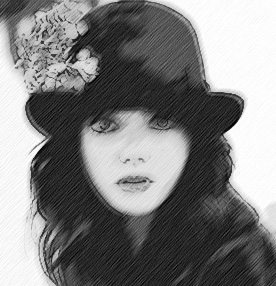
Now, you'll get a nice black and white sketch effect on your image.


6. To get a colored sketch, just put the Background Copy layer to invisible mode as shown below. By doing this you get to see some color from the original image at the bottom.


Remember the opacity settings in step 3c and 4e? Now that you're done with all the crucial steps, you can either increase or decrease the opacity of layer Background Copy 3 and Background Copy 2 to get a nicer effect on your image.

7. Finally, we are going to add a paper texture to amplify the sketch effect. Click CTRL + SHIFT + E to flatten your image.

8. Download some nice paper textures from the web or you can choose one from our Paper Texture Collection. Open the paper texture in Photoshop. Drag your sketch image onto the paper texture. Use the eraser tool to erase the unwanted background of your sketch image. Below are my layer settings to blend in the sketch image with the paper texture(s) as background. Of course you can experiment with other blending modes and opacity for each layer.

READ MORE...

Fancy Fonts For Poster Design

One of the things I love to do is to collect fonts. If that is one of your passion too, then I hope you'll enjoy this new selection of fonts I've compiled exclusively for the readers of this blog. Some of the fonts are designed to be in large scale. These fonts are great for big poster design where you can appreciate each detail, every curve and corner of the font. They could be useful for your next typography project. Play a little bit with the color combination of the letters. I'm sure you'll have a lot of fun with it. Click on the image to go to the creators' page and download the font for free. Well, they are free for personal use. For commercial use, you might want to read the terms and conditions first..just to be sure.

Ripe @ Ripetype.com Weston @ fontfabric.com

Viper Nora @ Dafont.com Carnivalee Freakshow @ dailyfreefonts.com


Chunk @ theleagueofmoveabletype.com Deibi by www.wetecacahuete.com

File @ fontfabric.com Five Minutes by cargocollective.com

Kilogram @ kallegraphics.com Lot @ Fontfabric.com

Blackout @ theleagueofmoveabletype.com Chubb by misstiina.com

Skinny Jeans by misstiina.com Toast by misstiina.com


READ MORE...

Download Coloring PSD: Dark Chocolate

I've been posting PSD file every Tuesday for two weeks in a row now. I might as well start calling this event PSD Tuesday..like that song Ruby Tuesday. {Well, to be honest I wasn't really familiar with that song until someone sang it on American Idol}. Enough with my rambling. I'm calling today's color effect, Dark Chocolate. Apply this effect to the right photo, you'll see the similarity with the color of chocolate you eat. Or sometimes, it'll give you the golden color of summer too. {Just typing this makes me wanna check out my fridge if there's any chocolate left from last week}. As usual, you can check out this tutorial on How to Use PSD File if you don't have any clue how to use the download PSD.

Download PSD: Dark Chocolate


Download PSD Coloring: Summer Sunshine

For those interested in color-editing your image in Photoshop, here's another Psd file for your download with more to come in the near future. So, if haven't been a follower to this blog, you might consider of becoming one, because we only post awesome stuffs here and you wouldn't want to miss that, do you? I'm calling today's coloring, Summer Sunshine. I believe you can figure out the reason yourself. Apply it on your outdoor image and you'll get the feeling of summer all year long. If you haven't used any Psd file before to edit your image, we have a short tutorial on how to use coloring PSD file.

Donwload PSD: Summer Sunshine


Download Coloring PSD: Caramel Coffee

This post is for photographers (professional or not) who love to post-process their photos in Photoshop. It is also for die-hard fans who spend their free time downloading their favorite artist's pictures from the internet and make fanarts out of them. Whatever your purpose is, I hope you're gonna like the outcome of this coloring on your photo. It's not complicated and I know you want to try it. So, just download the free PSD file and start editing your image to get the kind of brownish coloring as shown in the preview below. I hope you're all familiar with using PSD file. Otherwise, you can try to read a short tutorial on How to Use Psd File.

Download PSD: Caramel Coffee Coloring


How to Do Dotted Border and Dashed Border

Like every other post, it's like an obligation for me to type in a short introduction. Sure, you can go ahead, look at the picture and figure out instantly what this post is all about. But then, it wouldn't look so nice in terms of presentation or space utilization right?. So, today's tutorial is about creating borders in Photoshop. We are gonna learn to make two types of borders. The first one is a dotted border. And then, we'll continue with the dashed border. Please excuse my spelling and grammar mistakes (if any). It's quite hard to concentrate while listening (and singing) to Britney Spears' new tune.."Mama, I'm in love with a criminal and this type of love isn't rational"...


1. Open your image in Photoshop. Create a new layer. I'm gonna call this new layer "WhiteBorder". Then, go to Select > All. Choose Rectangular Marquee Tool (M) on your Toolbox. Right click on your image, choose Stroke. Set the width of the border (mine is set to 25 pixels) and set the color to white. Hit OK and you got a white border set up around your image.


2. Next, select Brush on your Toolbox and follow the steps shown in the picture below.


2-1. Click on 'Toggle the Brushes Pallete' to bring out the Brush Palette window.
2-2. Click on 'Brush Tip Shape'.
2-3. Choose the 1 pixel round brush.
2-4. Set the spacing of the dots you want for your border. You can see the preview of the dotted line below it.

3. Set the color you want for your dotted border. You can do this by adjusting the Foreground Color on your Toolbox. I set mine to Dark Grey.

4. Create a new Layer. I name this layer "Dotted". This is where we're gonna create the dotted border.

5. Let's go back to the WhiteBorder layer. CTRL+click on the WhiteBorder Layer to make a selection. Then, go to Select > Inverse to inverse the selection. You'll see that your image is selected.


6. On your layer palette, click on the "Dotted" layer. We're gonna start working with this layer now. Then, Select the 'Rectangular Marquee Tool' or hit M on your keyboard. Next, right click on your image and choose 'Make Work Path'. Set the tolerance to 0.5 pixels.


7. Choose the Pen Tool (or hit P on your keyboard). Then, right click on your image and select 'Stroke Path'. A small window will appear. Select 'Brush' as the Tool and hit OK. Now, right click again on your image and choose 'Delete Path'.


Below is your result.


If above is what you want, then you can stop here and save your image as usual. However, if you want something like below, continue with the next step.


Basically, what we're gonna do is widen the white border a little bit so you can get some white space between your image and the dotted border.

8. Click on the WhiteBorder layer on your layer palette. Go to Select > All. Choose the 'Rectangular Marquee Tool' (M). Then, right click on your image and select 'Stroke'. On a small window that appears, set a higher width value than your previous width in step 1. I choose 35 pixels (my previous setting in step 1 was 25 pixels).


So, that's all about created dotted border on your image.

* * * * * * *

Let's continue our lesson today. Next, I'm gonna show you how to do a dashed line border for your image. We will be using the same concept as the dotted border. Maybe tweak it a little bit to get the dashed line.

1. Follow the same step 1 in above tutorial for dotted border to make a white border around your image.

Basically,we are going to use the brush tool to create a line border. Then use the eraser tool to delete part of the line, so we got the illusion of dashed line around our image.

2. Select the Brush Tool and follow the steps shown below:


2-1. Click on 'Toggle the Brushes Pallete' to bring out the Brush Palette window.
2-2. Click on 'Brush Tip Shape'.
2-3. Choose the 1 pixel round brush.
2-4. Set the spacing to 1% to get a nice straight line.

3. Select the Eraser Tool and follow the steps shown below:


2-1. Click on 'Toggle the Brushes Pallete' to bring out the Brush Palette window.
2-2. Click on 'Brush Tip Shape'.
2-3. Choose the 5 pixel round brush.
2-4. Set the spacing to 200% to get a line of dots.

4. Set the Foreground Color on the Toolbox to the color you want for your border.

5. Create a new Layer. I name this layer "Dashed". This is where we're gonna create the dashed border. Below is your layer palette up until now.


6. Let's go back to the WhiteBorder layer. CTRL+click on the WhiteBorder Layer to make a selection. Then, go to Select > Inverse to inverse the selection. You'll see that your image is selected.


7. On your layer palette, click on the "Dashed" layer. We're gonna start working with this layer now. Then, Select the 'Rectangular Marquee Tool' or hit M on your keyboard. Next, right click on your image and choose 'Make Work Path'. Set the tolerance to 0.5 pixels.


8. Choose the Pen Tool (or hit P on your keyboard). Then, right click on your image and select 'Stroke Path'. A small window will appear. Select 'Brush' as the Tool and hit OK.


9. Right click again on your image and select 'Stroke Path'. On a small window that appears, this time choose Eraser as the tool and hit OK. Then, right click on your image and choose 'Delete Path'.

You got yourself a nice dashed line border on your image.


You can continue with step 10 below to get a border shown in below image (with a slight space between the dashed line and the image).


10. Click on the WhiteBorder layer on your layer palette. Go to Select > All. Choose the 'Rectangular Marquee Tool' (M). Then, right click on your image and select 'Stroke'. On a small window that appears, set a higer width value than your previous width in step 1. I choose 35 pixels (my previous setting in step 1 was 25 pixels). That's conclude our tutorial @ Best photoshop tutorials for today. Till then, good luck trying this new project in Photoshop.

RELATED LINKS:
Create Picture Frame Using Photoshop Filters
Getting a Rounded Corner Image in Photoshop
READ MORE...

Creating Border For Your Photo in Photoshop

Not many of us buy picture frame anymore. Most of the things are digital these days. So, it's only natural for me to write this tutorial on how to create a simple border or frame for your digital photo. Everybody posted pictures in Facebook or blogs but not many posted pictures with borders and frames as cool as what I'm about to show you later. So, why not be different (or if your prefer to call it unique) and separate yourselves from the plain masses. With the downtrend economy, nothing much we can do about it but sure we'll have plenty of time to sit in front of the computer and do something fun for a change.

Preview


We're gonna start with a simple border..a white border (or whatever color you decide to choose) and a transparent border.


1. To create a white border, first, open your image in Photoshop.

2. Next, what we're gonna do is create a new Fill Layer underneath our image. Go to Layer > New Fill Layer > Solid Color. Choose the color you want as a border. I'll choose white. Make sure you move this new created layer underneath your image layer.

3. Go to Layer > New > Layer. Name it whatever you want. I'm gonna call it "BorderLayer". This new layer should be on top of your image layer.

4. Click on the BorderLayer on your layer palette, go to Select > All.

5. Choose Rectangular Marquee Tool on your Toolbox (or hit M on your keyboard)

6. Right click on your image to bring up the available function. Choose Stroke. A small window will open, set the width and the color of your border. Leave everything else to its default setting. Hit the OK button.

And you got yourself a nice white border. (or whatever color you decided to choose for your border).

If you want a transparent border like our 2nd preview image, just lower the opacity of the "BorderLayer" to like 60% or less.

Okay, that's simple right? Now, I'm gonna extend above tutorial and show you how to do a polaroid-like border.


1. First, follow step 1-6 above until you got a nice white border around the image.

2. Next, choose a Rectangular Tool on your Toolbox. Create a rectangular shape at the bottom of your picture to mimic the polaroid empty area. Set the shape color to white.

That's about it. There's actually several ways to create a polaroid border. This is just one of them.

* * * * * * *

Thank you for visiting Best Photoshop Tutorials for this border tips. The next kind of border I'm gonna show you will utilize the Filters we have in Photoshop. We'll start with the Halftone Border Effect.


1. Open your image in Photoshop.

2. Now, what we're gonna do is create a new Fill Layer underneath your image. Go to Layer > New Fill Layer > Solid Color. Choose the color you want as a border. I'll choose white. Make sure you move this new created layer underneath your image layer.

3. Next, on the layer palette, click on your image layer. Go to Select > All. Then, go to Select > Modify > Border. Set how wide you want the border to be. Mine is set at 15 pixels.

4. On your toolbox, choose Edit in Quick Mask Mode (or hit Q on your keyboard).

5. Now, go to Filter > Pixelate > Color Halftone. On the small window that appears, set the radius you want. The larger the image, the larger your radius should be.
Experiment with some radius setting to get what's best for your photo. I choose 8 pixels as my radius. Hit OK button.

6. On your Toolbox, choose Edit in Standard Mode (or hit Q on your keyboard).

7. You'll see there's some selection made around your photo. Hit the DELETE key on your keyboard and deselect everything. Voila, (if all goes well) you got yourself a halftone border. It's cool, isn't it.

* * * * * *


Now, I'm gonna show you how to get the crystallize border above.

Follow step 1 until 7 above. BUT, replace step 5 with 5a asf:

5a. Go to Filter > Pixelate > Crystallize. Set the cell size. Again, experiment with the value until you get the best for your image. Mine is set to 10. Hit the OK button.

* * * * * *


To get sort of mosaic border above, follow step 1 until 7, BUT replace step 5 with step 5b below:

5b. Go to Filter > Pixelate > Mosaic. Set the cell size. Mine is 8.

* * * * * *


For the final border effect, it is a little bit special because you got the tiles all over the picture. To get the effect, again follow step 1-7 BUT replace step 5 with step 5c below:

5c. Go to Filter > Stylize > Tiles. Set the Number of Tiles you want on your image. I set it to 5 tiles (meaning I'll have 5 rows of tiles). Then I set the maximum offset to 5%. Leave everything else to it default setting.

P/S: If you must know how I got the retro color on my preview image above..I ran a cross-processing action file on my image after I was done with the border. You can find the action file @ DreamBig Action: Vol 1 and DreamBig Action: Vol 2.

RELATED POSTS:
Frame Border Photoshop Brushes
Rounded Corner on Your Photo

READ MORE...