
The Dragan Effect is made popular by its pioneer, Andrzej Dragan, a Polish photographer (hence the name 'Dragan'). This photo effect enables you to see every last bit of texture in your portrait. It emphasizes each line, freckle, wrinkle and pore captured by the camera, giving your photo kind of dark and grungy look. It's like you're standing face to face with the subject. With the right portrait, you can imitate this effect beautifully in Photoshop. Download our Dragan Effect Photoshop action and start your portrait project now. Tip: For more intense effect, merge all the layers after you run the action. Then, try the Unsharp Mask to sharpen the image even more.
Download Action: Dragan Effect Action
How To Use: Guidelines To Use Our Photo Effect Action
Dragan Effect - Before and After Image

ActionSection: Download Photoshop Actions
Welcome to our ActionSection, a quick navigation page featuring our collection of free Photoshop actions (.atn files. We've created this page to make it easier for you to browse through all the free actions available in this blog. If you're crazy in love with Photoshop action, then this page should be in your bookmark list. This page will be updated as we post more free actions for you. So, why not sit back and relax, and let the Actions do all the work for you.
READ MORE...
READ MORE...
Download Action : Pencil Sketch Effect
It may not be a perfect sketch but it's quite awesome (as awesome as watching Portugal scoring 7 goals in one game). Featured action for today is the pencil sketch effect action for Photoshop. This action set contains 5 actions. Each can create the sketch effect as shown in the preview images. Create your own black and white pencil sketch, or try our colored-pencil sketch featuring matrix-green, blue, sepia and red color. Tip 1: If you want a smooth sketch, start with a large image, run the action, and then resize the image to be smaller. Tip 2: You can also set layer 'Background copy 3' to invisible if that looks nicer on your picture.
Download Action: Pencil Sketch Effect Action Set
How To Use: Guidelines To Use Our Photo Effect Action
Pencil Sketch Effect (Before and After Image)
Color Pencil Sketch
Download Action: Pencil Sketch Effect Action Set
How To Use: Guidelines To Use Our Photo Effect Action
Pencil Sketch Effect (Before and After Image)
Color Pencil Sketch
Cross Processing with Curves Action Set
One way to enhance the coloring of your digital photo is using the Curve adjustment layer in Photoshop. It's a powerful tool that enable you to get different styles and coloring from a single photo. Don't worry if you're not that familiar with Curve. Download this action and run it in Photoshop to get the coloring shown in our preview below. Some tips for you: If your image is dark, duplicate that image and set the layer to Screen, adjust the opacity to your liking. You can also adjust the opacity of the curve layer after you're done running the action. This will adjust the intensity of the coloring effect.
Download Action: Cross Processing Curves Action Set
How To Use: Guidelines To Use Our Photo Effect Action
Curve 1 Action - Reddish Hue Cross Processing


Curve 2 Action - Yellowish Hue Cross Processing
Download Action: Cross Processing Curves Action Set
How To Use: Guidelines To Use Our Photo Effect Action
Curve 1 Action - Reddish Hue Cross Processing
Curve 2 Action - Yellowish Hue Cross Processing
Yellowish Retro Coloring Action
What do you guys think of the World Cup so far? Enough action to keep your blood pumping? Well, let's add something to that action, albeit it's a different kind of action. Here's another free image coloring action for your download. It will give that yellowish, kind of retro and old photo effect to your image. Again, most of the actions we offer here are created using adjustment layers whenever possible. So, it'll make it easier for you to adjust the settings afterward to whatever looks good for your photo.
Download Action: Yellowish Retro Coloring Action
How To Use: Guidelines To Use Our Photo Effect Action

Yellowish Retro Coloring Effect Photoshop Action
Download Action: Yellowish Retro Coloring Action
How To Use: Guidelines To Use Our Photo Effect Action
Yellowish Retro Coloring Effect Photoshop Action
Download Adjustable Text Effect Action Set
Weekend is coming and it's time for a new action. This action set contains 12 effects for your text. And what so special about it, is that all 12 effects are totally adjustable after you are done running the action. The effects are created using the available Layer Style options in Photoshop. So, you can always manually change your font, size of the text, even the color if you want, after the final result. Preview of all 12 actions are included below. And after the preview, you can view a user guide for the action as well. Enjoy and have fun!
Download Action: Text Effect Action Set
A/N: Sometimes people ask what font I used for my text. So, for this post, I've provided the links to download all the fonts used in the preview. You can click on the preview image to download the font. Last time I checked, all of the fonts are still free.
Ice Effect Text .. Golden Text
Jelly Text Effect .. Glass Text Effect

Metallic Text Effect .. Cracked Stone Text


Chrome Text .. Bling Text

Neon Text Effect .. Bee Movie Text


Alien Movie Text Effect .. Shining Metal Text
GUIDELINE ON USING THE ACTION
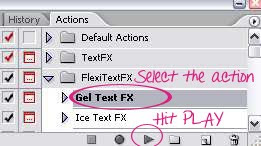
1. Open a new document in Photoshop. Select and run the action.
2. A small window as shown below will appear. Like the instruction says, click the 'Stop' button. Choose your Type Tool by hitting T on your keyboard. Then, type in your word. Don't worry about the font, color or size of your text. And the world will not end if you misspelled the word. You can change and correct them later if necessary.
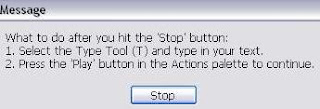
3. To continue, hit the Play button again on your action palette. And you're done. Below is the result.

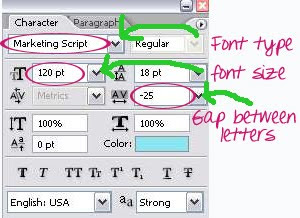
4. Now, if you think you need to do some adjustment on the font or the size of your text, click on the icon shown below to bring out your Text palette.

In the Text palette, you can change the font, size of your text and also the gap between the letters.
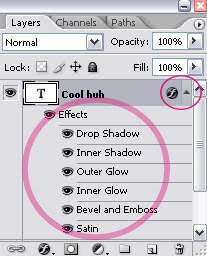
5. Further adjustment can be done if you decide to create something different with the effect. Take a look at your Layer Palette. Click on the drop-down arrow to see the Layer Effects applied to the text. You can explore them and create something new.
This action set includes:
Gel Text Effect, Ice Snow Text Effect, Bee Movie Text Effect, Metallic Text Effect, Chrome Text Effect, Cracked Stone Text, Glass Text, Alien Text, Billboard Text, Bling Text and Gold Text.
READ MORE...
Download Action: Text Effect Action Set
A/N: Sometimes people ask what font I used for my text. So, for this post, I've provided the links to download all the fonts used in the preview. You can click on the preview image to download the font. Last time I checked, all of the fonts are still free.
Ice Effect Text .. Golden Text
Jelly Text Effect .. Glass Text Effect
Metallic Text Effect .. Cracked Stone Text
Chrome Text .. Bling Text
Neon Text Effect .. Bee Movie Text
Alien Movie Text Effect .. Shining Metal Text
GUIDELINE ON USING THE ACTION
1. Open a new document in Photoshop. Select and run the action.

2. A small window as shown below will appear. Like the instruction says, click the 'Stop' button. Choose your Type Tool by hitting T on your keyboard. Then, type in your word. Don't worry about the font, color or size of your text. And the world will not end if you misspelled the word. You can change and correct them later if necessary.

3. To continue, hit the Play button again on your action palette. And you're done. Below is the result.

4. Now, if you think you need to do some adjustment on the font or the size of your text, click on the icon shown below to bring out your Text palette.

In the Text palette, you can change the font, size of your text and also the gap between the letters.

5. Further adjustment can be done if you decide to create something different with the effect. Take a look at your Layer Palette. Click on the drop-down arrow to see the Layer Effects applied to the text. You can explore them and create something new.

This action set includes:
Gel Text Effect, Ice Snow Text Effect, Bee Movie Text Effect, Metallic Text Effect, Chrome Text Effect, Cracked Stone Text, Glass Text, Alien Text, Billboard Text, Bling Text and Gold Text.
READ MORE...
Download Cross Processing Action Set
Cross processing in film photography is defined as processing film in a chemical solution meant for another type of film. This yield an interesting shift in color, and sometimes give a retro look to a picture. This effect can also be done in digital photography by manipulating the curves in Photoshop. Download this fun action set to spice up your photo instantly. Tips: For a dark photo, duplicate the image and set the duplicate layer to screen, reduce the opacity if necessary, then run the action. You can also set the duplicate layer to Soft Light or Overlay to achieve a slightly different effect.
Download Action: Cross-processing Action Set
How To Use: Guidelines To Use Our Photo Effect Action
Cross-Processing Action for Photoshop
Download Action: Cross-processing Action Set
How To Use: Guidelines To Use Our Photo Effect Action
Cross-Processing Action for Photoshop
Download Retro Old Photo Effect Action
One more photo effect action for your download. This action will give a yellowish retro-style look on your photograph. This retro effect is achieved using adjustment layers in Photoshop to allow some flexibility on your side. After you've run the action, you can change the settings of the adjustment layers according to your image. If you start with a slightly dark image, duplicate the image and set the layer to screen to increase the exposure. Some sample images included below.
Download Action: Retro Old Photo Effect
How To Use: Guidelines To Use Our Photo Effect Action
Old Retro Photo Effect Action
Download Action: Retro Old Photo Effect
How To Use: Guidelines To Use Our Photo Effect Action
Old Retro Photo Effect Action
Download Canvas Painting Effect Action
This canvas painting effect works well for portrait and various other images too. If you want to read the tutorial and follow the steps one by one, that might take plenty of your time to achieve this photo effect. Why not download the action file instead. It's fast and easy. My tip is to start with a large image, then resize your image to be smaller to get a smoother sketch. Below are some examples of this canvas painting effect and link to download the action.
Download Action: Canvas Painting Action
How To Use: Guidelines To Use Our Photo Effect Action
Canvas Painting Action
Download Action: Canvas Painting Effect
Download Action: Canvas Painting Action
How To Use: Guidelines To Use Our Photo Effect Action
Canvas Painting Action
Download Action: Canvas Painting Effect
Guidelines to Use Our Photo Effect Action
Some of the resource we offer here is 'Action'. Action or .atn file is a series of steps recorded in Photoshop to generate a certain photo effect (or in general, anything you do in Photoshop). This recorded steps can be saved and play-back at later time to achieve the same effect on different image. This action can also be shared with other Photoshop users to create the same photo effect. All you have to do is download the action to your hard drive. Load the action in Photoshop. Open your image and run the action. If you haven't start using action, better start now because it can save you a lot of time. If you download one of our Photo Effect Actions, here's a few guidelines for you.
Preparing your Image to Run the Action
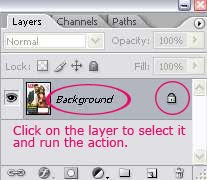
Open your image in Photoshop and make sure your layer palette looks like the picture below ie. (a)only one layer, (b)it should be named 'Background' and (c)it should be locked with a sophisticated lock symbol on the side. Click on the 'Background' layer on the layer palette to select that layer and run the action.
If for some reason, above is not the case for you, here's what you can do to achieve the correct starting point for the action:

Running The Action
1. Download the Action to your hard disk.
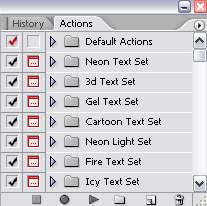
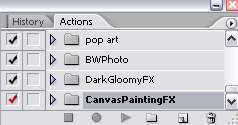
2. Fire up Photoshop. If you cannot see any 'Action Palette', on the menu above, go to Window > Actions. You'll notice the pallete below appears:
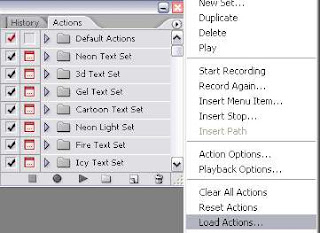
3. Click on the small arrow on top right hand corner and select Load Action. Locate the Action file in your hard disk.
4. You'll see a new action folder in your action palette. In this example, it's the 'Canvas Painting FX' folder.
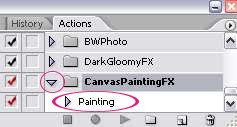
5. Click on the small triangle near that folder to see the Action available in that folder.
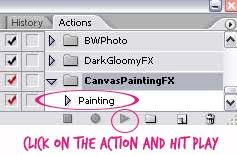
6. Open your image in Photoshop. And Run the Action.
READ MORE...
Preparing your Image to Run the Action
Open your image in Photoshop and make sure your layer palette looks like the picture below ie. (a)only one layer, (b)it should be named 'Background' and (c)it should be locked with a sophisticated lock symbol on the side. Click on the 'Background' layer on the layer palette to select that layer and run the action.

If for some reason, above is not the case for you, here's what you can do to achieve the correct starting point for the action:

Running The Action
1. Download the Action to your hard disk.
2. Fire up Photoshop. If you cannot see any 'Action Palette', on the menu above, go to Window > Actions. You'll notice the pallete below appears:

3. Click on the small arrow on top right hand corner and select Load Action. Locate the Action file in your hard disk.

4. You'll see a new action folder in your action palette. In this example, it's the 'Canvas Painting FX' folder.

5. Click on the small triangle near that folder to see the Action available in that folder.

6. Open your image in Photoshop. And Run the Action.

READ MORE...
Create Dark and Gloomy Photo Effect
Feeling blue right now? Let's create something to reflect that mood. This photoshop action is especially made to achieve the dark and gloomy look on your image. All you have to do is download and save the action to your hard disk. Load it in Photoshop. Open your image and run the action. Less than three seconds you'll get something like the sample image shown below. Before and after the blue and gloomy effect. This effect is created using adjustment layers. So, you're free to adjust the settings to achieve what's best for your starting photo. Tips: You can try setting the blending mode of the 2nd image layer to what looks good for your image. For instance, in the example below, the 2nd layer set to Color Burn with 95% opacity. You can try with Screen or Overlay blending modes as well.
Download Action: Dark Gloomy Effect
How To Use: Guidelines To Use Our Photo Effect Action
Dark Gloomy Coloring Effect in Photoshop
Download Action: Dark Gloomy Effect
How To Use: Guidelines To Use Our Photo Effect Action
Dark Gloomy Coloring Effect in Photoshop
Gallery : It's a Toy Story
I was watching Shrek and then there's a trailer of Toy Story 3. And it just gave me this idea for our next inspirational gallery. So, I did some flickr-ing and compiled this cute and amazing toys photography. Each photo tells its own story. Our interpretation of what we see may be different and that's the fun thing about it. I like to believe that there's no boundaries to imagination. So, sit back and enjoy the story. And maybe create your own some day.


READ MORE...
READ MORE...
Subscribe to:
Posts (Atom)


